Showing posts with label master grade infinite justice gundam seed destiny ZGMF-X19A. Show all posts

Monday, November 1, 2010

MGIJ WIP 11.1 - Back to work.

Last WIP for this was back in July 4. OMG. 5 months?! Wow. Well to my credit a LOT has happened this year and I didn't have enough time to work on Gunpla as much as I would have liked. There will be a post later about the events of this year.

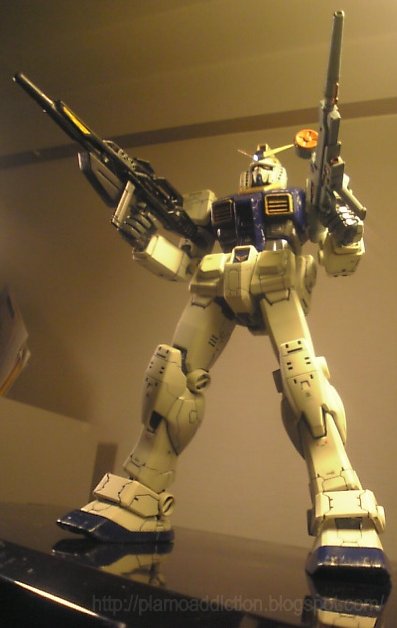
I'm not sure what prompted me to do it but I decided to just assemble this thing again to see where I was with it.  Actually I do know.  I had a half day of work today and am off tomorrow and the day after so I just decided to go into "Mecha Mode" and see where it takes me.  This is where it's taken me.

I'd actually done a little bit of work on it over the past couple months. I mean really not a lot. Working on the rifle and hands and doing experiments with some secret chemicals I got (which I may not use for this project anymore and use on the HG Sinanju instead.)

I think that might have been when I got off track. When I started doing the experiments and didnt get the results I was hoping for. Then naturally, as is my way, I gave up and started working on something else. Man I should really start keeping track of what I'm doing like Gaigun does.

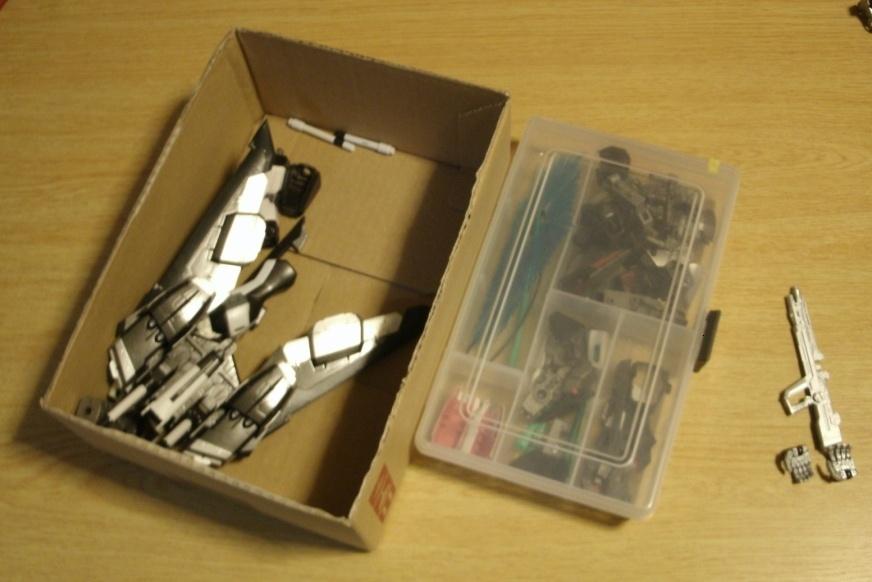
First is to find all the pieces.  I put them in 3 different places!


And immediately proceeded to get distracted again. Was just going to reassemble and leave it at that but then decided to just go for it since I really don't have that much further to go.  No sense in moving backwards.  Forward!  Onward!  Upward!

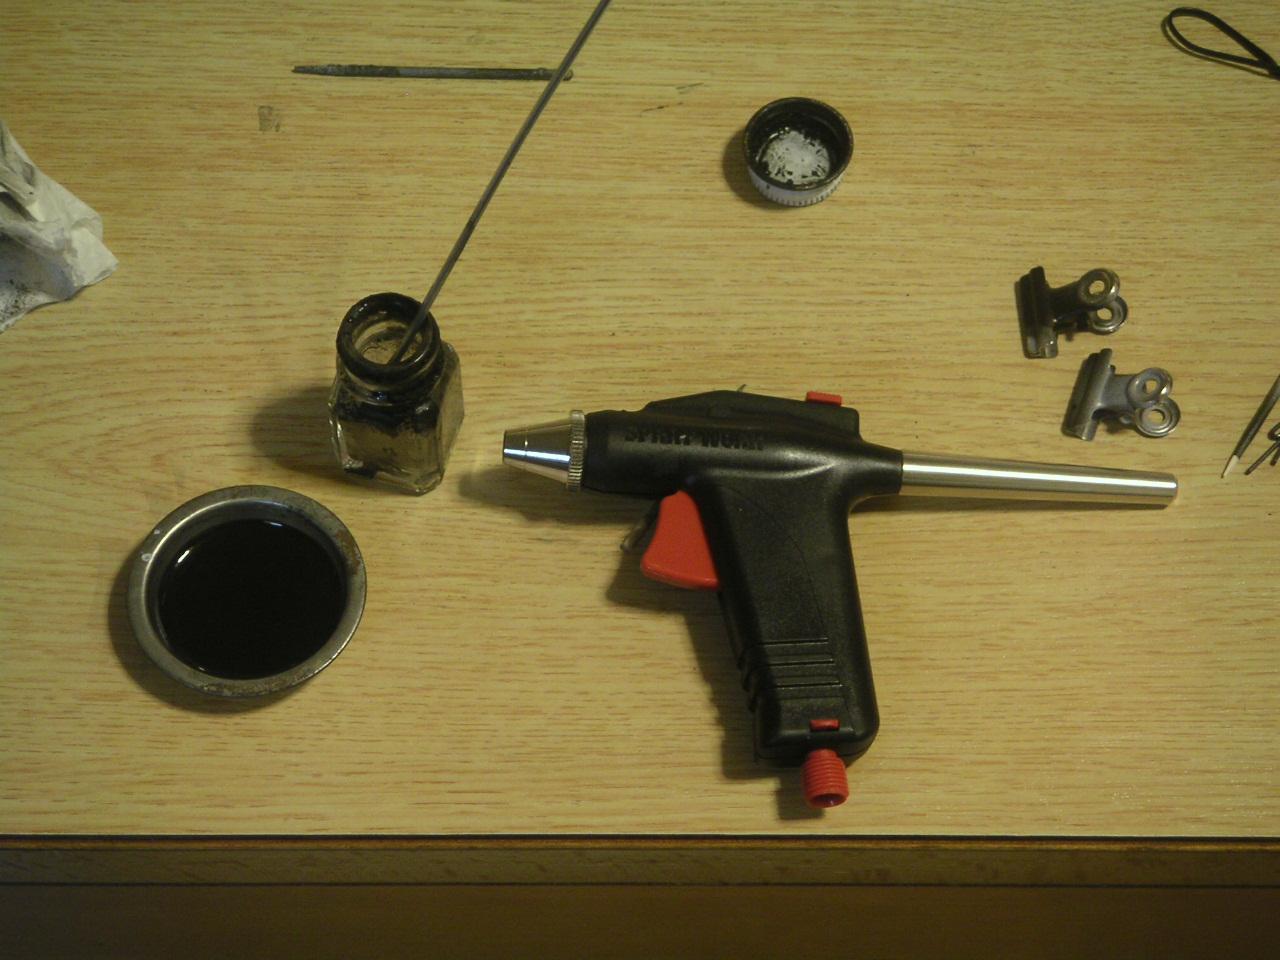
So I separated the parts for painting and went to work with the airbrush again.  If I hustle I can finish this before the F2000 drops.

Sunday, July 4, 2010

MGIJ WIP 11 - Head

Write up is on the individual photos on the Picasa gallery page. Easiest way for me. To upload and to write. Blogger is still a bit inefficient in my opinion.

From MG Infinite Justice

Sorry formatting is a bit sloppy.  I'll do better next time!

Here are my notes from the Picasa page.

1. I decided to use my trusty mirror tape for the lense work. took a bit of cutting and shaping but i eventually got it the way i wanted.

3.i originally tried to paint the tape but it caused it to loose its adhesiveness so i just decided to paint clear green on the lens instead. the stickers that come with the kit are opaque sky blue. unacceptable.

4. little bit of lining work. ive decided to make a dedicated sumi-ire paint jar... which basically means i've pre-made dilluted black enamel paint specially for panel lining purposes. hopefully this will make the process a bit easier for me.

5. painted titanium gold

6. i also had to paint the inside edges of the helmet black so that no pink shows through. had to do this with the sinanju as well.

7.hand painted flat aluminum. you'll barely be able to see this when the head is assembled but i had to paint it on principle. i was hoping for a bit more POP but i'm not sure what i have that will do the job.

Tuesday, June 8, 2010

MGIJ WIP 10 - Backpack finished

Little bit of a crossover with my Musha MKII WIP as I just assembled the swords for it but since it's still in the frame stage I let my Infinite Justice play with them for bit. Infinite Justice is loaded with beam blades but has only one conventional blade in the "grapple stinger" housed in the shield.

I don't think the Japanese style blade really fits the suit itself but I just liked the idea of it having another melee weapon.

The back pack is totally painted but still needs to be lined. I still need to do the head, torso and some touch ups on the legs. Also I'll probably need another coat of white on the arms as well. Sad to say this kit is still a ways from being completed but... one step at a time!

The parts here were painting with my airbrush.  Metallic black and silver.  I thinned the paint considerably but it seemed to work out OK.  Better to err on that side I realize.  Better to have it too thin than too thick and have it jam your brush up.  I'm happy with the end process.  Even if airbrushing takes a bit longer and is messier you can't argue with the results.

Yeah sorry I'm posting these through imageshack because it's way faster than the blogger interface. I doubt I'll keep it like this but I'm just experimenting. Trying to stream line my posting process as well as my modeling process. Let me if any problems arise please.

Monday, May 24, 2010

MGIJ WIP 9 - Organization / Prep for painting

But before that, gotta eat. Thai yellow curry this time. Chop up yellow pepper and some tofu. I save the seeds and plant them on the balcony later.

Horrible pour on that beer there but whatever.  I let it sit for a while and drink from the can while it settles down.  Yellow curry was much sweeter and milder than the green.  Much more manageable.  But a bit too mild I think.  I need a bit more of an 'edge'.  I'll try red next and see how that goes.
Regular dinner guest.  What a mess my table is.


Picked up this plastic tool box from the 100 yen shop.

Thats's better!

This might seem like a pointless post but I do want to underscore something with it. Organization is important and can definitely help your work flow and painting process. I organized everything by the colour that I wanted to paint them and it helped me speed up the painting process. Not to mention there's less of a chance for things to get lost. I want to thank two people in particular for this idea. DC23 and Ngee Khiong. Their organization skills really inspired me.


How about you guys? Would you say that you workspace/projects are quite organized or are they all over the place?

Wednesday, May 5, 2010

MGIJ WIP 8 - Shoulder modification: Section 2

Got a bit distracted because Splinter Cell: Conviction came in the mail (brilliant game btw) and I bought a lot of energy bars to prepare for the malnutrition that I was about to subject myself to by playing the same for too long.

At the bottom you can see some Kotobukiya "vents" that I bought.  There are called "nozzles" on the package though.

Closer look.  Many sizes to choose from.

Decided to go for the double nozzle.

Wanted to close up the holes on the underside as well even though they won't be seen.  I do a lot things just on principle.  If this were a real machine it wouldn't be left like that.


Sanded and primed.  While I was waiting for it to dry I ate.


Sorry old boy it's going to be a bit longer for your arms.

Thai Green Curry with some cheap 発泡酒 Yeah I'll drink that stuff too. I like my beer, don't get me wrong but... Seriously. It's cheap as ****.


I wasn't prepared for the level of spiciness that is Thai Green Curry. I needed another drink.  Red Frame approves.  Don't ask me where I got the HUB glass because it's a story I'm not very proud of.


Primed.  I will accept this result.

Sprayed metallic black later which you've all already seen.

Wednesday, April 21, 2010

MGIJ WIP 6 - Shoulder modification: Start


Maybe you can guess what I'm going to do here?

I bought clear pla-plate by accident a long time ago and I told myself that I wouldn't buy anymore until I use some more of this stuff up. Actually it's come in handy for some other non-modeling projects too.

Thursday, April 15, 2010

MGIJ WIP 5 - Beam effect part recolour

My first time to attempt this. The pink beam effect parts will look out of place with my new colour scheme so I'm changing them.

First used the last of my Tamiya Gray Primer on them.

The white 1000 Mr. Surfacer I was used initially was too thin and the pink was showing through. Can't have that contaminating my colours. I did it with Grey Primer again after.

After I saw the mold lines I decided to shave them off and make the blades smoother. I initially tried sanding the parts but... I didn't want to ruin some of the detail and wanted to keep it smooth.

It was fine. The primer did a decent enough job.
After this I covered them again in Mr. Base White 1000 (much better than the Mr. Surfacer in my opinion!) because I didn't want the grey throwing my colours off.

I tried making a mix of clear green and silver because I wanted a bit of shine/reflection but it didn't look right. Naturally I jammed up my airbrush in the process. >_>

Base White again then I sprayed them clear green later and it looks okay but... I'm not sure how it's going to look in the end and if it will match the way I want it too. I might do a light wet sanding job and then respray them to make them pop a bit more. The paint seems a bit uneven right now and too dark in some places. I was going for a kind a gradation effect starting light at where the beam connects to the emitter and darker near the middle or end of the blade.

Has anyone seem beam effect parts painted well? And I don't mean just paint clear red on top of pink. I'm talking about changing the colour. Like from pink to blue or something. I've never seen it done before. At least I've never seen it done in a way that I liked.

Something like what Keita did here is nice.


How do you think he did that? White, pink, gloss coat? Is his airbrush work really fine or is it just the lighting? I can't tell. Also I think it's much easier when you're doing this type of the stuff with colours in relatively the same spectrum. Blue to green for example must be easier than blue to orange. Red to pink probably isn't that tough and wouldn't screw things up too much. I don't get how it's possible to do a clear coloured part recolour but still keep the transparency/translucence.

My result came out close to this on the regular beam sabers but I couldn't replicate it for the leg and FATUM beam blades. Not sure what I did wrong... I think the key might be to use really thin paint as I painted the beam saber blades as my paint was running out...

Tuesday, April 13, 2010

MGIJ WIP 4 - Paint filtering

I love posting about the mundane aspects of modeling. Ugh. One more time!

Let me tell you two things about me.

One thing that sucks. I know something isn't going to work but I want to see just how badly it won't work. Actually I'm hoping that I'm going to be wrong and that it actually will work. My initial instinct is usually right though.

One thing that's good. I'm a tenacious son of bitch. Sorry mom.

So basically I'm painting and I'm using old enamel paint from like... 10 years ago.There's some dried up paint in the bottle but I add some thinner and mix it up hoping that it will dissolve and spray OK. I know this is a bad call and that it's probably not going to work but... let's try anyways.

Of course it didn't work because some of that undissolved stuff got into the airbrush and jammed it up. Cleaning out the airbrush was like cleaning the shower drain. I saw some pretty nasty things and I was like "wtf? What is that and how'd it get in here?"

That said I've pretty much become an expert in disassembling and cleaning my airbrush.


I decided that I'm going to filter this paint just to see what's going on and get some usable paint out of this whole thing. Begin the filtering process. Basically I poured all the paint into a paint tray and then filtered it slowly by allowing the paint to trickle down my paint rod into the jar leaving the 'sediment' or whatever it is behind. I'd then wipe that out and repeat. I did it about 5x or so until I was left with pure smooth paint in the jar.

What I found in the paint trays was a bit unusual though.


Some type of crystal/jelly type of material. I have no idea what it is but large chunks of it were getting stuck in the airbrush. Smaller particles actually sprayed onto the part I was spraying giving it a rough almost gritty texture. I didn't like that.


So I sanded it down with some 320 grit paper. It was a bit rough but it was what I had laying around and I didn't feel like going to find my 1000. I figured It doesn't matter since I'm spraying over it anyways and the part is supposed to be flat black so shine/texture doesn't really matter. Of course I don't want it to look TOO rough but the 320 was fine.


Sprayed again with the filtered paint plus a bit of extra black. I was hoping for a flat look but I got some gloss! It's nice! It feels like I got kind of a mirrored surface here and I really wanted to protect that for some reason. I might just keep it like this.

The good thing about experimenting is that sometimes you end up with results that are better than what you expected.

That said, it's not perfect. I can still see a bit of the sanding lines, a couple tiny sediment pieces in the paint. Very tiny and you've have to be looking really close to see them but it's within my margin of imperfection and I can let it go.

Onward. Slowly but surely.

Sunday, April 11, 2010

MGIJ WIP 3 - Mischievous PC parts / New saw

While stripping the armour off for painting I found that I was really struggling to get the upper arm armour off. It absolutely would not come off! I didn't want to force the issue and cause more damage so I did what any frustrated Gunplar would. I cut the damned thing off. I made vertical cuts on either side and cracked it like a nut. I realized that the PC part that connects the arm to the shoulder was sticking up just enough to prevent the armour from sliding off.


I pushed the PC part in a bit more on the other arm and the armour slide off nicely... No cutting necessary.

I made this blog to chronicle my experiences with this hobby, both good and bad. This was an elementary oversight and I hope that some of you will now be made aware of this and avoid making this mistake yourselves in the future.

When you're removing armour, check the placement of the PC parts before you pick up the the saw.

*end public service announcement*

That aside, the mini saws/etchers I picked up recently, worked excellently. Totally worth the 280 yen I paid for them.

Thursday, April 8, 2010

MGIJ WIP 2 - Acrylic paint thins with what?

Water?

I read that on the net in a bunch of places but it didn't work.

As some of you may remember, the first time I used acrylics in my airbrush it produced a less than desirable effect.

I thinned it wrong then and I'm thinning it wrong now. The water didn't do any kind of dissolving at all. Actually I was able to pour the water out of this and leave the paint in. That's how separated it was.

I gave up and just used some thinners I had laying around. I think they were enamel. The paint dissolved, I loaded it up and sprayed. It seemed to work.


I will accept this result. I thinned it too much and the paint come out ultra thin and runny but it atomized well. If I spray at a distance I can get a decent coat but I need to do it two or three times to get it looking nice and dark enough. Gloss coat on the metallic black would make it really pop I think. I'm using Mr. Hobby #78 Metallic Black which I believe is an acrylic paint. Otherwise I've really been screwing up!

Upon comparing this with my Sinanju I realize now that this paint is practically identical to the Tamiya Metallic Black lacquer mini spray can I was using. Hindsight. Oh well.

-

Just a quick note here about using the airbrush. I'm still a beginner but I have to say that I am LOVING this machine. It's a bit more of a pain to paint now (as in I have to prepare for a painting session before I actually do it) but it's actually more fun and the amount of the control I have now is amazing! And this is from a cheap beginners airbrush that has a pretty wide spray field in comparison to what most other modelers are using.

Still though... when I think that I spent 120 yen on the paint, 400 yen on a big bottle of thinner and I thinned like a cap full of paint and put it in a tiny paint jar, I didn't even go through a third of it and I could spray over a dozen pieces to satisfaction. Very impressed.

I still use spray cans though because sometimes I just want to spray something quick and be done with it but yeah... Very wasteful. Convenient but wasteful and not nearly as much control.

It's amazing to think that there were days when I hand painted! Can't imagine going back to that now.

Saturday, April 3, 2010

MG Infinite Justice WIP - Preface

I'm suspending all my other projects now to work on this. Actually I'm cutting out the GM Quel when I feel like doing less creative things and just need to shut my brain down for a bit or when I'm waiting for the paint to dry.

First thing is I have to find the damn model. I often pack my unfinished models away but I have so many Gundam boxes that I lose track of where what is.

I found it this plastic bag. Everything except for the torso which was in another place


Found everything EXCEPT for the small piece that keeps the V-Fin in place... Of all the pieces to lose... I have to lose one that small.

I need that piece so... commence the cleanup... of EVERY Gundam part that I have... which is substantial.

Everything was quite scattered around in a bunch of different boxes. I have a lot of models sitting in hibernation right now. A lot of accessories, weapons, hands, extra PC parts, extra everything it seems.

I organized it into some different categories then placed them into their own bags. Models, weapons and hands, PC parts, extra parts, accesories, and display stand parts.


Lotta PC parts. And this is with most of the unnecessary runner parts snipped off!

It took some time but I guess I was just driven. I didn't quite feel like myself. More focused than usual.


Just kinda zoned out and organized while listening to music. I get that way at night sometimes. This was around 2am.

I cut parts off of runners and threw the runners away to save on space.


I went through a lot of plastic.


What am I going to do with all these guys?

And after all of that I STILL didn't find the one piece I was looking for!


Packed everything up and decided that I'd just have to make another one...

And then...


There it was. Sitting on my handkerchief. I don't know how or when I got there. I don't really care but I'm glad it decided to show up!

So he's back to combat readiness again and waiting for his upgrade.