
Seeing the results, I decided I'd try this technique out again on the Astray (I can't call it the Red Frame anymore...)
Here are my tools.

Pretty simple. Usually I use a napkin (I keep the extra fast food napkins I get when I get take out) dap a bit of paint on it and rub the toothbrush bristles in it. The bristles on the toothbrush are normal softness but have gotten harder because of the paint that’s dried on it. Generally I use a silver enamel paint for this because it gives the type of contrast and light reflection that I'm looking for however I might move on to 'Dull Aluminum' the next time I try this. Just to switch things up and try something new.
I 'scratch' some marks onto the part and that's it! This technique works really well on edges and parts that have extra detail (as in some raised or sunken sections). The bristles catch on those sections and leave the paint there adding a lot of depth to the part.
Depending on the type of look you're going for, you can use a different kind of brush. For example of you're going for a slight wear and tear look or a more metallic but slightly dull finish to the part (ideal for people who like to do internal frame work) a soft brush would be recommended. The most important thing is to take the excess paint off the brush before applying otherwise it won't be much different than painting the part normally. Get rid of that excess paint! The less you have on the bristles the finer it will look in the end. After all... it's called DRY brushing for a reason! haha Also a brush with bristles in a fan shape is best for this. Recommended but totally optional.
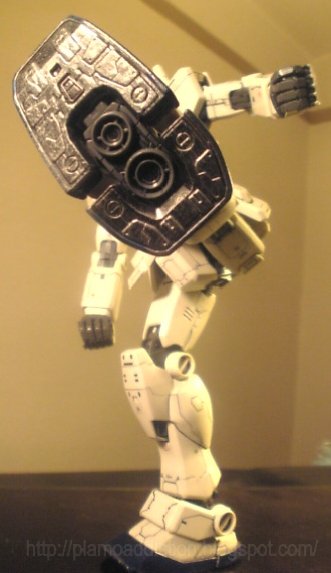
The theme I'm going for on this Astray (you'll understand why when you read the story I made for it) demands this type of hard bristle work. I wanted the frame to look well used. Not like it'd been through hell and back or damaged but just that it had seen it's fair share of usage.
In this case I didn't even use a napkin and just used the lid of paint jar and applied the markings lightly (but still leaving thicker lines than usual). I didn't do this for any special reason. I was just lazy and thought that since most of the frame is going to be covered up that I don’t need to do a superior job on the frame; just an adequate one. And the results are adequate for me.
Astray Strike Frame Update:
Sub armour has been painted, touched up and attached. I don't have much left to do here. I'll be starting the armour application process before the end of the week. Trying to eliminate all the red from this project has been quite the undertaking but my experience with my EE Sinanju has definitely been coming into play with this process. Again. What is it with me and red? Just can't stand seeing it on my mechs sometimes.
lol. for some reason i like red mechs XD
ReplyDeleteI have found that bright colours such as yellow, reds, oranges are really difficult to get to stick to the plastic when using spray cans. Yet the darks and silvers stick so wonderfully. Discuss. ;)
ReplyDeleteI am definitely trying this dry brush technique, and soon!
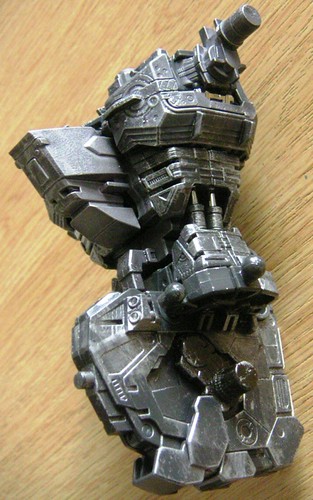
o0o will try this out in the future (already have a model planned for it). by the way, that's one badass pic of your OYW xD
ReplyDeletep03 - to each his own i guess!
ReplyDeletegg - i never found them difficult to stick, but difficult to get even. those colours often require 1 or 2 extra coats to get it looking even but with darker and or metallic colours generally you dont need much paint. its an aesthetic and cost saving move on my part hehe.
z - i like it too! kinda like he's kicking the camera.
also im looking forward to seeing your techniques in the future guys. im sure you'll do it better than me!
Can't blame you for not wanting another Red Frame. lol You had already a NG Red Frame before.
ReplyDeleteIf you were to do that 'been to hell and back', I imagined a charcoal Black Frame. Seems like your personal colour scheme is officially black and gold. XP
true! but I think i'll be getting away from that a bit for the next couple of models i do.
ReplyDeletehey can you post a new indepth tutorial for noobies on these?
ReplyDeleteim a follower of ur site for quite sum time already