Saturday, February 28, 2009

GM Command and Sinanju - Simultaneous work and gold lining

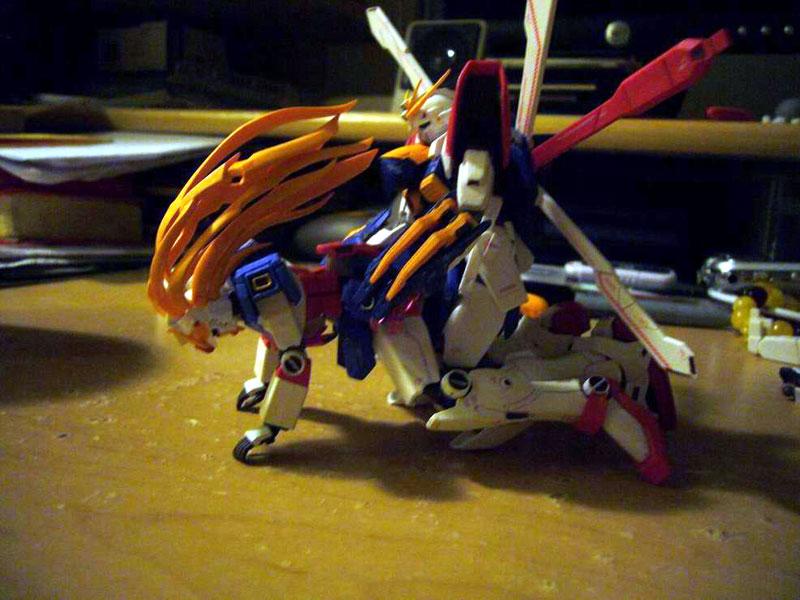
I decided that instead of just committing all my effort to one project I'm just going to spread it out. So... if I'm painting some gold on the GM command I'm just going to paint gold and the Sinanju parts while I'm at it.

Lots of detailing today. I want to get away from using my 'scratching' technique because it leaves the surface a bit scarred but it works well otherwise. I've essentially done all I can for the parts I was working on today.

First I wanted to show a shot of the tools I was using today and give a bit of an explanation. Maybe I can give other modellers some ideas and perhaps get some myself in the progress.


In no particular order,

Lacquer thinner - the primary paint type I use is lacquer (markers and spray cans).

Lighter fluid (enamel thinner) - I use enamels for special/detailed parts. Although I did use blue enamel for the armour of my OYW RX78 and my G04 (which I may scrap and do over again).

Gold Gundam marker - ultra useful for detailing on the Sinanju.

Black Gundam pens (regular and fude brush type) - generally I use the regular one but tried the fude type out today. It’s ok. Regular is still better though in my opinion.

File - for creating for creating the C Surface. The paint was not sticking to the upraised edge of the Fed emblem on the shield so I filed it down a bit like in the MK2 video I posted. Worked great.

Old toothbrush - for brushing away dust after scrapping/sanding. I don't know why I didn’t do this before. So handy. I used to just wipe it away with my finger, but the bristles really get in there better. Like brushing your teeth with your fingers... doesn’t make much sense does it? The bristles are there for a reason.

Fine paint brush - bristles are getting a bit frayed... but I’m so cheap... I just use a bit of Vaseline on the end to smooth it out.

Paint trays - ultra cheap and ultra useful. I use them almost exclusively for thinner.

Exacto knife - I suppose I should use a design knife but... don’t want to spend the money. What’s the difference anyways? Besides the handle, and shape?

File set - the different shapes are actually useful. I’ve used all 3 almost equally.

Dropper - For extracting and expelling thinner. This little thing is SO useful! I used to pour it manually all the time. Messy and inefficient. Glad I got this thing. and it was so damn cheap too!

Gunmetal and gold enamel paints

Cut up milk/juice carton - OK... this is basically my palette. It has a wax surface so it doesn’t really absorb the paint that much... and since its garbage/recycling anyways, there’s no reason to clean it up. If the paint dries... a little bit of thinner on there and you’re good to go. Yeah pretty ghetto I know but that’s me.

Onto other things, I tried out the naphtha based lighter fluid on the gold enamel paint in order to do the lining easier.


After some trial and error I got it eventually.


Would have helped if I deepened the lines a bit with my engraving tool but regardless... I love the technique and am going to try and do it from now on. I’m no longer limited to black and grey panel lines now!

If you haven’t tried this technique out yet try it with a metallic paint. It looks amazing! Sorry this pic does show it so well.


It's constantly moving... it reminded me of a video I saw of the surface of the sun. Like it’s constantly boiling or something... I love chemistry.

Thursday, February 26, 2009

Today's loot; tripod, Cold Districts GM and GM Command


Actually the RGM-79D isn't for me, it's for gr3nd3l for winning my first anniversary photo contest. It took me a bit of time to find a mass produced HG 1/144 version of the suits he requested but in the end he settled on the Cold Climate GM and I went and picked it up today.

In the spirit of friendship (which is what my photo contest was all about) I went and got myself a matching MS to commemorate the event. Also I'd gotten interested in the GM Command after using it so often in the Senjou no Kizuna pod game. It became my favourite suits to use and even now when I'm facing strong opponents it's my 'go to' suit because I can handle it really well and have got most of the upgrades I need to make it work the way I want to, which is a good feeling! It was actually hard going from GM Command to Cold Climate... they play a bit differently, but I think, if I were to be a pilot in UC for the Feds I'd like to be in the GM Command the best (during 0079-80 at least). It's a refined mass produced suit. Not for elite pilots, but for exceptional ones. It's mass produced but not at the same time. Limited production run but high spec. My kind of suit, but I digress.

I actually like the paint scheme for the GM command so I'm not doing a re-paint. It was a spur of the moment purchase (really... it was cheaper to buy than one drink at most bars around here) so I'm just doing lining, decals and minor details. Hope to be done before the end of this weekend. Perhaps that's a bit ambitious but I just want to finish something!

I saw a lot of really nice tripods today, some as cheap as 680 yen but two were on sale for 980 so I just bought one of those. It's a bit bigger than I need but I'll adjust. I got to thinking that a tripod would be good after reading this post on taking pictures. I was expecting to pay around 2000 yen but... yeah I'm an amateur and don't have a great camera but the blurriness from hand shaking is a problem for me so... why not?!

Funny I was just getting back into my Sinanju too... I was working on the torso last night. Oh well! All in due time!

Wednesday, February 25, 2009

More PG Astray pics and news

I was away filming a documentary for a couple of days and when I got back my Hobby Japan was waiting for me in the mail. Instead of wasting time scanning it myself I'm just going to use other images already on the net. Same thing. Someone just beat me too it. Image courtesy of SRW hotnews.


I was reading this in bed last night. I'm pretty excited about this one. I'm going to be there on the day it's released! I've been waiting for a new PG for so long. Just wasn't really feeling the other ones so much... but I have been having some crazy ideas for PG Wing Zero Custom recently...
Maybe someday!
For now this Astray is at the top of the list. It's kind of wierd... I was thinking of displaying it but my 1/100 Astray is right there too! I almost never get two model kits that are the same type just on principle. I want a different experience each time I build a model. That's part of the reason why I didn't buy the Musha Gundam. Same frame as the OYW version. Granted it is considerably different but still... One exception to this rule has been the Infinite Justice. I have 3 of those. But in my defence, it is probably one of my favourite mobile suits ever. And I have 5 VF-1 type Valkyries...
My mind is running over ideas for what to do with the Astray once I get it... I'm definitely doing a re-colour... but I think I'm only going to re-colour the frame and just leave the white armour as is. Just thinking... Still about a month before it's released but it's really going to be the center piece of my collection. I'm sure of it. I thought the Sinanju would be but I'm just this one is going to overshadow it. Literally.
I have a long history with the Red Astay. It's a very important suit to me for many reasons (and not just the one's mentioned in this blog). I'll spare you the details but it's always going to be a suit that's close to my heart. I'm glad that it is becoming a PG. Not many suits get that honour. I am glad the the Red Astay is one of them now.
It is worthy.

Friday, February 20, 2009

RGM-79C Powered GM - Painting Issues - C Surface?

No I haven't switched projects to the GM Powered, but Tonzo asked about more info on the C-Surface technique (check this post and comments section if you don't know what I'm talking about), and I thought it was the same issue that happened to my Powered GM, when I tried to paint it. Let's take a look.


Apparently I was mistaken. It isn't the same problem... It's the opposite. Inward right angle surface instead of outward facing ones. As you can see most of the places the paint missed are on the inside corners... actually NEAR to the inside corners. The corners have paint in the them. I'm not totally sure WHY it turned out like this.
I did this when I was working on my MG Impulse. Just decided to spray the Powered GM since I had the paint out. Less than desireable result as you can see. However, I primed the lower leg armour and sprayed those as well and they turned out much better. They could still do with another coat of paint but yeah... for an initial spray (this is before I learned a lot of stuff mind you) it doesn't look that bad. Acceptable by most standards... but by mine? No. Not really.
So... I'm actually not sure just how necessary creating the C-Surface is. Apparently it's never been an issue for me!
As for how I'm going to fix this paint problem... Might just take a short cut and use my Gundam paint markers on the trouble spots. If it looks horrible after, I'll just put on another coat of metallic black to even it out.

As for his question about "...more detail about scraping the primer on the edges back? In what instances would this be necessary and why? Is a second coat of primer required?"

Most modellers (well I've only seen Japanese modellers do it to be honest) do it for edges that come together at right angles, because at the point where those two angles meet there isn't really enough surface area to hold the paint! So they scrape it down or round it out a bit to create a large surface area for the paint to stick to.
Image you're painting a table. The top surface is A and the sides of it are B. The edge where A connects to be B is C. That's the C surface but... it's just an edge really so these Japanese modellers sand that edge down a bit so it becomes more of a surface. Paint will stick AND stay there much easier if you do it that way.
That's the theory behind it. The first coat of primer is for basic surface preparation and error detection. After scraping... a second coat isn't totally necessary (depends on you really and how serious you are about it) but it is recommended if you want a complete and uniform paint job.
That was probably the issue with my Powered GM. No hard right angles. As for when you it's necessary to do this... I'd say do it when you're concerned that the paint won't stick to the edges. It's probably unnecessary but I'm doing a modified version of this technique on my Mass Produced Guncannon. But in my own limited first hand experience I must say that I haven't had this problem at all.

Thursday, February 19, 2009

Strike Gundam ver. Green Dragon

If you haven't seen this masterpiece yet here's your chance. I believe this is #3 in his set of "Four Legendary Mobile Suits". They are ALL very impressive but this one was my favourite.


Want more? Check here.

Wednesday, February 18, 2009

Intermediate Gundam Modelling Tutorial Video - Vol.1 - MG Titan's Mark 2

First of all this is a widely available video on Youtube and I'm sure some of you may have seen it already. I watched this video for the first time... a long time ago. I can't remember. But as I'm going through building my RX-77D I decided to take a look at some of the videos again to get some ideas for the processes that pro modellers like to use.

Although it's not my favourite video in the series it is a good one as the techniques the modeller uses (Sorayama Ryuji) aren't that advanced, but they do require a lot of patience. I would be interested in knowing the total time he spent on making it.

For these posts I'm going to do a running commentary of what's going on. Let's get to it.

Part 1:


3:20 - First we can see that he STARTS by spraying the surfacer on the individual panels before cutting. Like I did with my MG Impulse and with the Sinanju (didn't take pics of that part). Now while I believe that Surfacer and Primer or two different things I think how they're used in this instance largerly achieve the same objective; preparing the modelling surface for painting and smoothing over imperfections. Someone correct me if I'm wrong.

3:50 - C.Men. Semen?! Sorry. OK well I can totally understand why he'd do this because I had this exact same problem on my GM Powered. I didn't prime and sprayed right on the part and sure enough the edges were still in orange. I am using a similar technique to this on my RX-77D but I'm sanding it by hand and not using a design knife to make the C Men/surface. Thing is... for this model he's not doing a drastic colour change at all so I think this step could be omitted. But for the sake of perfection/completion/safety... It makes sense.

5:23 - 500-600 grit! I'm using 240 right now to prepare my surfaces... Too rough? I wonder. We'll see after I prime it.

5:53 - They don't say what he does about the nubs...

6:10 - Some parts seem to be sanded down and others don't seem to have been touched at all, as in the surfacer is still totally intact - compare the shoulder and the cockpit hatch. I wonder why?

7:00 - 2nd round of surfacer! But it is a good way to see errors that you might have missed.

7:20 - Drawing his own panel lines... That must have taken forever.

7:35 - Holes... good idea. I'm going to steal that one.

8:40 - That tool looks useful. I could have used that when I was trying to do the lines on my G04. Man was that difficult. Just the design part, nevermind the execution.


Part 2:


0:40 - To make one bit look deeper he raised the whole surface... a bit extreme but I understand it. Gauging it out with the other tool would have been uneven. Kinda clever actually.

1:45 - OK this is just a space/equipment/jealousy thing. Setting up all those parts on sticks like that... and being able to spray in his room... WITHOUT gloves or a mask. With a decent chair and desk. I can only dream about that right now.

1:55 - Surfacer round 3! Wow. That's a helluva way to be exact.

5:20 - Black undercoat for the silver to make it darker... hmm... Probably works better when you can control the flow/stream/pressure/consistency of the paint with an airbrush. This technique won't work well with cans I think.

6:00 - 4 hours to paint?! Wow. That's why I never do all my painting in one sitting.

6:30 - I LOVE this lining technique. Thing is you need to thin the lining paint with something that won't destroy the paint job underneith. And how do you do that?


I enjoy these videos but I'm often left without of lot of questions at the end of them, and my Japanese isn't good enough yet to understand all of the explanations. I can make out bits and pieces here and there but... I'm a long way from understand all the words and grammar patterns used for this type of talk. Oh well.

Notes:
-It seems like he left all the seam lines intact.
-They didn't talk about what he did for the lenses and the face.
-I wonder if he had any problems with movement because of the paint/surfacer.

Tuesday, February 17, 2009

Capsule Grade Arios Gundam?!

What grade is this? I was out with some friends the other day and on the way home I decided to go into a... capsule center?! I don't know what to call it. But they have all these capsule machines with various things inside. I went for the Gundam one obviously but there were like 10 of them so I went for the one that I thought had the coolest mechs in them. I really wanted the Tallgeese but I was not dissapointed with this little guy! Shots taken with my cell phone with PG Mark 2 for size comparison. Oh yeah, the capsule cost 100 yen or $1.09 US as of today.


Monday, February 16, 2009

RX-77D Guncannon Mass Production Type - Stage 1

Well I hope you all had a great Valentine's Day. I did but I got a speeding ticket... :( bleh.

OK onto today's post, about my work on the RX-77D Guncannon Mass Production Type.

First, this kit is seems so extraordinarily simple after working on the Sinanju. My mind felt relieved at the relative straight forwardness of it all. Also... I hope to be able to incorporate some of the techniques I learned (and used) building the Sinanju into this model with a better effect. At least I should be able to see the results quicker. First I'll start with the assembly

This kit only has three panels and not that many parts. I decided that, for this kit, I wasn't going to snip or sand away the nubs as I usually do and just left them on. Usually when I remove a piece from the runner I shave down the nub with my knife. When I first started modelling I actually took it a step further and sanded it down. All of my model kits have sanding marks where the nubs where but that was the only part I sanded. Because of that those parts would collect dust and dirt the fastest (because of the extra grooves). I'd constantly be scraping at that surface to clean it (when it got really bad).

For this kit I decided that I was going to do heavy treatment on all surfaces, that means sanding at the end, before priming, and then, if necessary, sanding again before painting. I also wanted to do ALL the seam lines for this kit and went through great pains to do so... well... that's an over exaggeration, because nothing about this kit is a great pain. It's all very simple. Refreshingly so. So because I decided that I was going to commit one whole stage for surface preparation I didn't do ANY doing assembly. Just got the pieces off and stuck them together! That was it. I've done this only once before and that was with the FG Rasiel and GN Sefer and I realized that omitting that one step cut down my build time DRAMATICALLY. I built the whole kit relatively quickly. Maybe 1 hour. This is what it looked like at the end.


I was very happy. It looks great in its stock form. Not a lot of articulation or range of movement but... its a long range support mech. It's not meant for flashy moves or speed. I'm not doing any upgrades or mods to this kit at all besides the holes which I'll talk about now. This is a relatively common mod for this kit. Take a look.


I bought an electric drill a couple of weeks ago to fix my tape deck (Don't ask. It worked though.) and decided to also use it for this project. 44 holes later and I'm done. I added a bit of basic putty to some areas just to smooth it out. I'll sand it down later. This is basically what I've done so far.


Before I drilled, I scored the drilling areas a touch so the drill bit would find the center more easily. It was a nice idea but didn't help much. The bit tip was a bit too blunt to find the small hole I made. Either way it worked out fine in the end.


After I glued the pieces together using Tamily Cement (liquid) I organized them into sections according to colour. As usual this is a re-colour job and I will be changing the colours of all the pieces. Red to Olive or White, Brown to Gun Metal, Blue to Black


Special note about the shoulders. The shoulders actually have two separate layers, so the first one has to be seamed and sanded before the 2nd one can be started.


That's all for now. Now the sanding process will start. I think it may take a while

Friday, February 13, 2009

Music to model to? -supplemental (Hip Hop)

I totally didn't represent my true favourite type of music in that last post so here's one dedicated to it!


Opio


Leak Bros. (w/anime video?!)


Group Home


and gotta play some stuff from the guys that put them on. It's only right.

Gang Starr


Jay Z


and finally I'm rolling out on KRS-ONE aka Kenny Parker aka the Teacher with one of my favourite tracks from anything, ever. Gotta get a little bit of conscious rap in there.


* * *

RX-77D Update

I'm drilling holes in it with my electric drill. Problem is that I usually work after midnight and the drill makes noise so progress is slow (I don't want to disturb my neighbours). Gonna do a bit more now (it's 3:15pm). 24 holes to drill in the cannon shielding alone! 20 for shoulders... But it's going well!

All the parts that need to be seamed have been. Using cement. This model is perfect for people wanting to practice that but more details on that later. I'm going to sand then fix up errors with basic putty, but that's aways down the road.

Wednesday, February 11, 2009

Music to model to?

OK, well Tonzo asked me what kind of music I listen to when I'm modelling and the basic answer is just about anything. I use last.fm a fair bit actually to find new music. But these days, here's a sampling of what's on my Ipod. I know my style of music isn't for everyone but he asked. However I think I can safely say that there is something for everyone on my Ipod. From classical to jazz to rock to hip hop to J pop to metal... it's endless.
So here goes. This is just a sample! I am a music FIEND so I listen to a lot of stuff.
To get the full effect you have to listen to it like I do. So turn the TV off, sit down and work on your model for a little bit while you listen to these.
First we'll start with the Killers. Sorry can't embed this one!
Moving on...

Incubus


Foo Fighters


Madlib


Ohio Players


Miles Davis w/Herbie Hancock


and finally... Castlevania?!


I better stop now.

I will provide an update on my RX-77D in a seperate post. Don't want to mix business with pleasure in this case. Besides, I'm thinking of compiling all my posts into one 'tutorial' at the end of it, so I want to get a kind of consistency going.

Monday, February 9, 2009

My Sinanju, motivation, plamo addiction and my girlfriends advice.

Well... I've fallen off the wagon. Again. I bought another model kit today. Spur of the moment. RX-77D mass produced Guncannon for $6.50 US or 600 yen. For that price how could I not!? And it's one of my favourite MS! And it's rare! The thing is... I told myself I wouldn't buy another kit until PG Astray in March because I have enough stuff to work on but... when I saw it I just couldn't resist. It was too good an opportunity to pass up so I bought it. That puts my list of UNOPENED kits up to 6! 4 I bought last year (at the same time no less. Long time readers may remember when I bought HG 1/144 Aegis, Justice, Savior and Infinite Justice close to this time last year), 1 I got for my birthday (HG Zeong) and now this. My blog is appropriately named. I have a problem.

That brings me to my current project. MG MSN-06S Sinanju. Re-colour. I'm working on the legs and I'm doing a little bit each night. Each time I try to do something I notice something that's not quite right. Something that I want to fix... and I do. I have been fixing ALL the little things that have been bothering me about this project and it's taking time. And I'm getting tired. It just seems endless and to be honest... I'm kind of sick of looking at the same things over and over again. It's been about 6-7 weeks now. I think it's time for a change.

So now on to my girlfriend’s advice. I talk about this stuff a lot with her and she listens. She says that the only reason I push so hard is because of the blog and that's kind of true. If I wasn't doing this I probably wouldn't work on my models so often. I wonder. I'm OK with getting this model done eventually but... I just want to do a good job. A thorough one and I feel I'm getting jaded now. Jaded? Maybe just tired. I'm being disgustingly meticulous again. And I'm starting to take short cuts and I'm letting more things go as time goes on. Not a good sign.

She says, "Why don't you make a WIP (work in progress for the uninitiated) area? You can put all the models that are WIP there and just switch it up whenever you want and it doesn't have to be a big deal. You can just pick and choose as you like."

Good idea. She has a lot of those. So I do what she suggests. I re-organized my room. Put away all the kits and parts that I wasn't using. Cleared up space, organized things better. I assembled my Sinanju as it is and put it on another shelf instead of on my table where I can see it all the time. All the hobby magazines, manga, books, literature etc. are all in one spot now. All my sand papers, paints, extra parts, unfinished kits, they're all in another area. Really it makes sense, that’s how things should be, but it wasn't that way for me. It was all just scattered. I mean they were in general areas, but things are much better now. Take a look. This is just my table. But I have basically everything I need right there.


To those of you who have seem my work area before you may notice that the RITZ can with my tools in it looks a bit different now. I covered it up with some manga newspaper. The red crackers tin look just wasn't doing it for me.

To those of you who have never seen my work area before... the speakers are there so I can listen to music while I work (notice the IPod connected to it.) and the little blue storage bins have extra blades, tools, tooth picks, sand paper etc. in them.

In short, I'm retiring my Sinanju project. Well, it's more on hiatus. I'm definitely going to finish it. I'm just not sure when. But that's OK... It will all get done in time. But I'm working on a lot of different things. It's easy to get caught up in it all. Sometimes you have to take a step back and re-evaluate things. I did.

I'm going into the RX-77D project now. Bought new paint for it (Olive Drab. Going straight military on this one, weathering and battle damage included. A first for me.)

I also brought out and re-assembled my G04. Going to start working on that again too (sorry to those of you that have been following my WIP at the Plamo Out There forums. I get distracted easily apparently!) . Even bought some new hands for him. But those cost me almost the same price as the RX-77D itself! wtf. Also bought some extra weapons for this kit. Just because I can. Here's a pic of today's loot.


Need those XBOX points! A new R-Type game just came out! I must have it!

So I'm starting over. Need to start looking at things with new eyes again. Start something new. Or work on something I haven't seen in a while. When I come back to the Sinanju I'll be able to do a better job on it than if I continue the way I am now. Just not that type of a worker I guess! It's seems to be a re-occuring theme in my life.

Now... even though it's not finished yet... to those of you who have been waiting, here is what my re-colour looks like so far. You can get a basic idea of how it's going to look in the end.


I'm calling my Sinanju project "Ebon Enforcer".

That's it! Sorry to those of you who were hoping to see my finished Sinanju soon. You'll see it eventually but it just won't be this season. Probably in the Spring. I hope!

Friday, February 6, 2009

And the winner is...

Gundam 00 Family

gr3nd3l chose GM, Quebely (mass produced in ZZ Gundam) and Bawoo. I'm going to try and find the Bawoo for you since that one seems really cool and it doesn't look like you have it yet! I'll keep you informed via E-Mail of the search and sending process.

I choose this photo because I felt this pic went above and beyond the theme of friendship. It almost seems familial. 2 1/100's representing the adults or older siblings and two SD's representing the children.

Indeed the title of the pic was '00 Family'. Also the custom gatling gun on Exia's GN Sword didn't hurt either.

Another point that I liked was the fact that Exia and 00 are suits that are related directly. 4 different model kits but only 2 different MS. They're all related some how and it is a very close relationship. Also... the pic looks like a family photo. Like they all decided to go over to Wal-Mart on Sunday and get photos done or something. Looks almost professionally done! Love the backdrop and the fact that the colours all match. Well done gr3nd3l! Thanks for playing and congratulations!

Also... honourable mention / 2nd place goes to Mr. K.M. who provided us with this lovely image. Doesn't get much "friendlier" than this! lol

Position1

A snapshot into an "intimate moment" between G Gundam and Nobel Gundam if you will, haha. Even the lighting is slightly "romantic". haha Great stuff. It almost seems spur of the moment. Like they both couldn't wait or something. Sorry K.M. I wish I could send you something for it but it's not within the parameters I set. For this contest there is no prize for 2nd place. Maybe for my 2nd anniversary? Regardless thanks a lot for sending that in.

Some other entries (in no particular order.)

From fellow blogger Z.

IMG_0878

My favourite part of this pic was the two Strikes together at the right. Nice touch! And little SD G Gundam on the ground! haha what happened to him? Poor guy. Lots of stuff going on here! It was a good entry.

From fellow modeller Aulon:

doki-doki

Not used to seeing the Overflag in such a feminine pose but I like the idea!

And from Mr. Ani, the only entry that used props (I guess the cup counts though doesn't it.)

DSC01273

I really like the use of perspective and scale in this pic. I liked this one right away. And was in close consideration for the top prize.

There are a couple more unposted images at my flickr if your keen to take a look.
Thanks everyone for playing! It was a lot of fun and these pics really made me smile. Hopefully they'll make a lot of you out there in cyberspace smile too! Or maybe they'll make you feel something else...?

Position2

:)

That reminds me... when on Earth are we going to see MG Nobel Gundam?!?! That thing would sell like crazy, I'm telling you! I imagine there would be a lot 'custom' variations... oh well. Someday!

Tuesday, February 3, 2009

G3 Gundam


rx783
Originally uploaded by Busterbeam

Well unfortunately the big news this month is the G-Fighter for the MG RX-78-2 v.2, which I'm not too stoked about. I think it's a fine kit and all but I'm just not really interested in it. It's hard to beat the OYW version as far as I'm concerned. Anyways most of the hobby mags this month are going on about the G-Fighter so... I'm left looking for some content to post about.

I'll start here. Not because I like the model but because I LOVE the paint job. I've always liked the G3 version a bit more than the others because of the more subdued colour scheme. This scheme takes it to new levels with the totally metallic look. They go into great detail about how the artist achieved this look and believe me it isn't easy. But it is impressive. I'll post an image of another impressive G3 later.