Showing posts with label hguc. Show all posts

Friday, January 27, 2012

Jestas 2 - Main Assembly Complete

All done and it was a lot of fun.  Prepping the parts wasn't so enjoyable but it has to be done.  Nubs all over my clothes.  On the desk.  In the box.  On the table.  On the carpet.  Sanding.  Blah.  Messy.

But it was a nice opportunity to enjoy listening to music, talking to friends or family, watching stuff on TV.  Sometimes I wonder if it's not the Gundam's so much as being able to do the other things at the same time.

No way.  It's the Gundam's!  But it really is such a relaxing hobby sometimes...  I've learned a lot of stuff while building Gundam's and goodness knows it helps with women because they can just keep talking and I can actually pay attention to what they're saying because I'm doing something else at the same time.  Weird how that works.  Can't give a woman your full attention.  That's just ridiculous! (jk to all my female readers.)

Anyways, onward!  To the pics!

After the cleaning I brought out all the parts and organized them by section.  Guess work but when you've built as many Gundam's as I have this part is actually pretty easy.


Very fun!  Trying to think of names and which one is going to be #1 and which one is going to be #2.  Hard to decide since they were both made at exactly the same time and parts from either box have been intermixed.

Oh yeah!  Alternate configuration.  Ngee and I don't have anything in common there.  I NEVER want to do it the standard way like it is on the box.  I'm going to switch it up if I can.  I need to do it my way.

U.C. 0096 Big Boss.  I have 6 suits from that era now and they are all GREAT.

Tag Team Champions

Sinanju vs. Jestas x2.  Who wins?

Yes!
 Totally worth it!!!

Sunday, January 22, 2012

4 Years

Yep it's been that long already.  I won't make some long winded post this time...  Anyone whose been reading this blog already knows most of the story but here's a quick recap of the past year of Plamo Addiction.  Sorry no links.  It's all there on the sidebar if you want to know the details.

Jan - My last of month of 8 years in Japan.  It was a hard and busy time but an amazing one.  Packing up my kits and posters preparing them for the voyage across the Pacific to meet relatives they've never seen before.  It was also the last time I met fellow Gunplars ASM and Gaigun and had a great time in Osaka enjoying many beverages, food, discussions and all things Gundam.  I'd bought the PGSF the month before and continued work on that up until it was time to leave.  I bought my last few kits (MG Mk.II ver.2, GN Sword IV Full Saber Kit, HGUC ZGok Experiment, HG Nobel, 1/144 Nataku, ANA OO a gift from ASM and Graham's Union Flag, a gift from Gaigun) got rid of as much unnecessary plastic as I could and finally left the Land of the Rising Sun, a place which I'd called home for yearly a decade!  さようなら and 本当にありがとうございました!  Looking back on it getting that many kits in a month, considering what I paid was truly luxurious.  I had no idea how much my life would change in that department.

Feb - I bought the new HGUC GM Custom at Narita on my way back.  The last Gundam that I'd buy with my own hands and money.  The end of an era.  I did one of my first reviews if not my first actual proper one.  I had time and space now living back at home.  A lot of time and space but how to use them?  My Gundam's ended up being absorbed into my mom's doll collection while I sorted it all out.  I didn't do much Gunpla but I kept following the news and did a couple back posts on the PGSF and some other smaller kits, HGUC Sinanju, RG RX-78-2, ANA 00 and RX-78-2 Gundam while also talking about new/upcoming releases, MG Epyon, Shenlong and HGUC Dreissen which was a lovely surprise for me.

March - Decided to follow through on the polling results and picked the MG Exia as one of the next kits that I'd work on.

And you know what... I'm just going to stop there.  Too much really happened to recap.  This post will read like a boring novel if I keep going.  And I don't want to bore myself.  Because if I do that I'll stop and nothing will happen.  (See fall posts for 2011)

Which brings me to something I want to talk about now for this 4th year anniversary post.  Unfinished business and finishing it.

I'm going to try and do that.  Progress has been slow.  A lot has happened.  And not just to me.  A lot of my fellow bloggers have slowed down or all but disappeared.  Things have changed.  People have moved on with their lives.  Children.  School.  Work.  Moving.  Natural disasters.  Accidents.  Deaths.  Births.  Life.

All that stuff plus paints, airbrushes, putty, camera settings, lighting, tripods, tools, competitions, plastic.  Our chosen hobby.

Man I've been gone for a while.  Forgot what it was like to write again.  Well let's see if I can't get a feel for this blogging thing again.

No longer a blog about Japanese experiences with this hobby.  Now we do it entirely from North America.  Think I've got a handle on how to do it here now.  It's so nice to have the space to spread the army out finally.  No one has to stay in boxes anymore.  One mech at a time... they have have a place now and I'm happy about that.

But let's start this new year in my blog and in my Gunpla life with a project that I've been looking forward to for some time.

Jestas

Aas is my custom when starting a new build, let us first bring out the honour guard to welcome our new brothers into our midst.  Every project has an overseer and for this it is the HGUC Unicorn Gundam.  It's only right.  The Jesta units were made from Unicorn data to protect and supplement that suit.  I now also have a lovely Phatasy Star maid-bot so she will probably be present during the sanding/cutting/cleaning process.  Thank you Elenor.  Your first job.

Also present are Hazel and GM Quel as brother units and also as predecessors to the Jesta design and scheme.  We always give respect to those that came before us here.

So here we are.  Enter: Year 4.


Jesta parts are kept in the black Crown Royal bag.


Thursday, September 8, 2011

RGM-96X Jesta

If there's a day that I regret not living in Japan anymore it's today.

I must have it. I MUST have it!

Monday, July 25, 2011

HGUC Jesta

Oh yes. Finally. Must have. Hell I might even get two or three of them!

Sunday, February 27, 2011

HGUC Dreissen

From G.G.


As much as I love the Dreissen... This doesn't look quite right.  I think I would have liked the head to be just a bit flatter...  Guess I'd better wait for the finished model shots.  My enthusiasm has gone down a bit though...

Tuesday, February 22, 2011

HGUC GM Custom - Review

I never do reviews.  But this is a new era of Plamo Addiction (cue the reverb) so...  Time to switch things up.

Preface:  My Build Process

After building more than my fair share of Gundams, I've finally settled on a build technique that suits me.  I even do this with MG's but I'll detail that process separately when I review one.

1. I cut out everything and attach parts together that are meant to go together.  Like the two halves of a helmet for example.  I cut them out and them attach them together lightly, so they can be pulled apart easily.  I do this for any part that has a "partner".  Naturally this varies depending on the suit but I'm sure that most of you have built at least one Gundam model and know what I'm referring to.  If you don't... you'll see soon.

2. Not all parts have partners.  I cut those out too.  Very small parts I leave connected to the gate so I don't lose them but I cut around the runner, leaving only the parts I need.  Confused?  Scroll down to the pic that is 3rd from the bottom (the PC parts).  You'll see what I mean.

3.  I generally start from the waist because it is the center of the mech.  From there you can branch out and keep attaching parts.  I like seeing the mech form in that way.  Waist - Chest - Legs - Shoulders/ Arms - Head - Backpack - Weapons. The second way is to hit the largest pieces first just to get them out of the way.

The primary reasoning behind this is get as much plastic out of the box as quickly as I can.  I don't like having a lot of unnecessary things to look at.  I don't need all that runner plastic so I get rid of it right away.  I've built enough Gundams so that I know which part goes where (outside of PC parts), the manual is more for "confirmation" purposes than a "guide".

This is the same reason why I tend to assemble larger plastic pieces (like large rifles or shields) first just so I can get them out of the box or finished and then I have less things to look at.  This enables me to work faster as the build progresses while also giving me the satisfaction of seeing the mech "come to life" before my eyes, which is the part I like most and why I always assemble the frame first and then put the armour on after.  I'm a true "mecha" fan.  I like the "machine" aspect and enjoy building and looking at the "frame" and mechanical detail parts as much as I do the finished product.  This is also why I'll spend an extra amount of time to paint or highlight the parts of the suit that have exceptional attention to mechanical detail.

That's about it.  The build process varies from kit to kit and these aren't hard and fast rules but more like general guidelines that I tend to follow when I get a new kit.

I'm taking the time to explain all this now so you can better understand what's going on in the pictures and why I'm doing it the way I am.

Alright, let's get on with it!

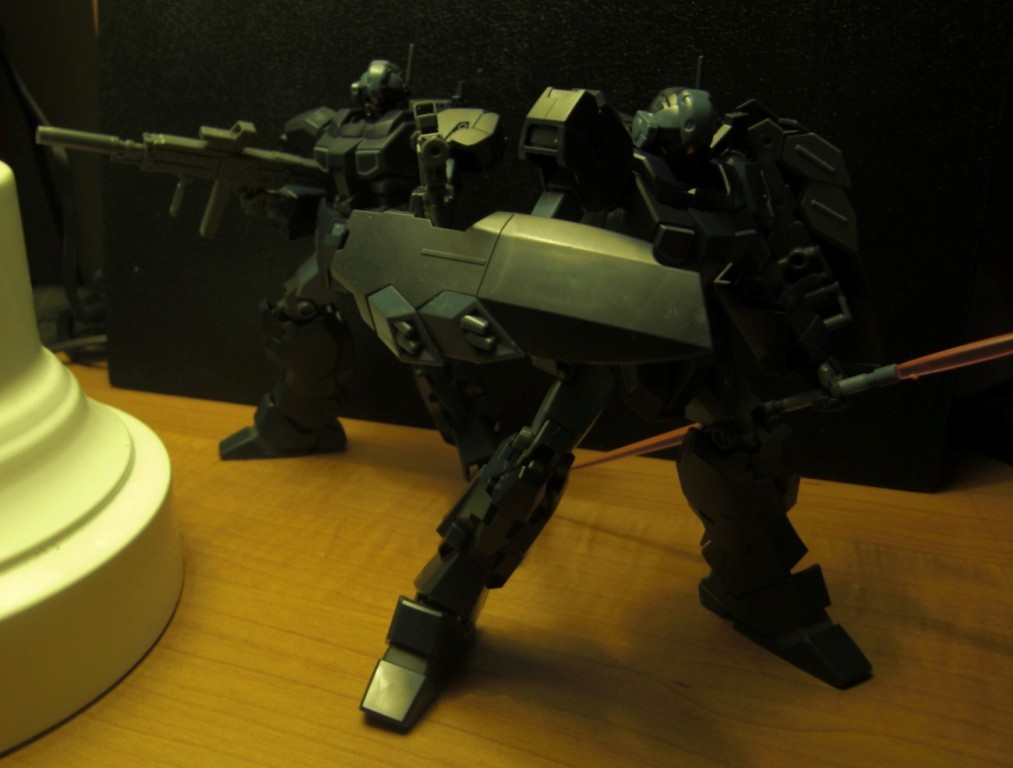
The mech in question.  I'm a big fan of the GM Quel and this is almost the same suit but when I saw the reviews of this... I knew I wanted it.  After I built it I realized that it is different from the HGUC GM Quel in just enough ways to warrant the purchase.  I picked this up in Narita Airport as I was leaving Japan.  Truly... I bought Gundams right up until the very last moment that I was in that country.  As of now this is the LAST Gundam I've bought... And I can't see myself buying another one for a very long time.  I won't say it's my last Gundam... but there's a high chance that it will be.  At the very least this Gundam does symbolize the true end of an era.  And the beginning of another.  Thus it becomes the first Gundam that I officially "review".

As mentioned above I cut out all the parts and placed them with their "partner" pieces (which are generally right beside them on the runner).

Here are those same parts attached together loosely (so I can separate them easily.)  I do this just for the sake of organization and greater ease when I'm searching through parts in the box.  No Ngee Khiong EX style of paper box organization for me.  I just toss everything in the box and look for it manually later.  It doesn't take me that long.  Of course we're just talking about a 1/144 scale here.  I couldn't do it like this with a MG.

Assembled pairs plus add the parts needed to "complete" them.

Stand alone parts that won't need to be dis-assembled again.

Extra or single parts that don't have partners.

Organize the rest into their respective pair groups.

Standard mod.  I ALWAYS do this with HG's.  Generally the front skirt is molded as one piece so both sides move together.  I don't like that.

Simple.  Cut it in the center with the nippers and trim a slight bit so that they both move smoothly and independently. 

Semi assembled.  You can see that the newer HGUC's kind of have a frame of their own.  Not as intense as the MG's of course but... still a frame none the less

Parts that will be added to said frame.

Just a couple of small things left to put on.

This is pretty much all that's left after this much building.

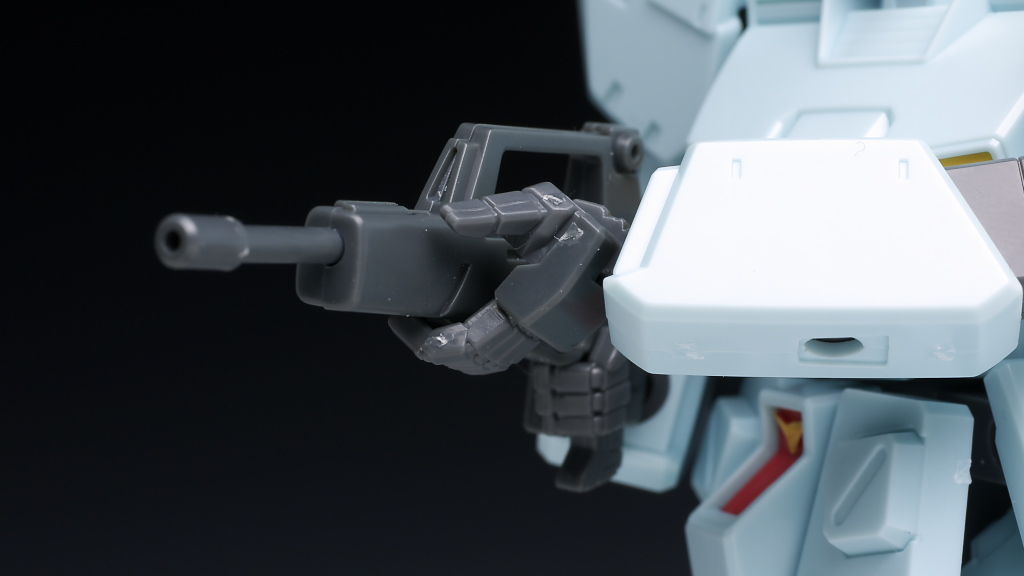
KEY POINT:  The wrist joint of the hand on the right allows this model to hold the bullpup machine gun better than the other hand.  This was a problem I had with the GM Quel and ended up modding the rifle because of it.  I'm glad they changed this.  This is also the same type of hand that comes with the ReZel Commander so that it can hold it's rifle properly (which it still can barely do despite that.)

Even with the improved wrist, it's still a simple 2 piece part so it does still come apart easily.  This model comes with so many extra hands that I just glued it together with extra thin cement (after using this stuff I'll never go back to regular cement again. This stuff is awesome.  Little bit of clear green paint spilled on it while crossing the Pacific Ocean.  No other damage luckily!).

And here he is!  All done!  An important feature of this kit is the left hand gripping the underside of the gun.  It has a proper wrist joint so you can get poses like this with little effort.  I think this should become standard practice with all HGUC's from now on.

And it comes with so many different types of hands!  This is awesome!

And this is all that we're left with at the end.

With ReZel's hand and cannon.  I love giving older MS, weapons that weren't around when they were made.  Like the RX-78-2 with the Sinanju bazooka.

Here he is guarding my "Blade of the Immortal" collection.
Conclusion:

Good kit.  Very good kit.  I'm impressed.  The design is good, articulation is good (especially in the ankles and wrists) and they give you enough hands that you can give it a bit of personality and put him in a bunch of different poses.

Armament is sparse.  Two beam sabers, bullpup machine gun and a shield but that's what this suit is all about.  It's a soldiers suit. A high ranking soldiers suit but not something a new type ace would pilot.  I like the GM Custom for that reason.  It's a limited edition upgraded mass produced suit which is basically... my type of war machine.

The proportions are good.  Better than the Quel (which looks a bit lumpy in comparison to its predecessor)  and I really do like the shape of the head better.  I even like the protruding shoulders which is kind of rare for me.  I think it works with this suit.  I also think the idea of a baby blue MS is kind of ridiculous but... I like it here for some reason.  I think it all works.  And that's a telling sign for me.  Separately there are many things that I usually don't like about the design of some mobile suits in general and the GM Custom has a couple of those things but for some reason when I look at this suit, none of it bothers me.

The wrist joints sealed it for me though.  Being able to have it pose with both hands on the rifle and have it look naturally was a big selling point for me.  Glad I finished the previous era with this kit. It's great.  Looking forward to really working on it later on down the road.

It's a good example of what modern HGUC MP suits can be.  Very good, very well rounded.  The most telling thing is that 
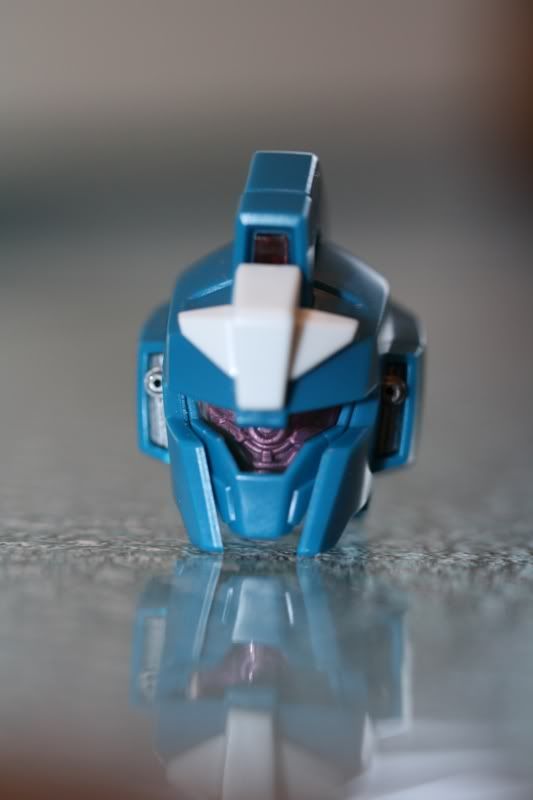
I have nothing bad to say about this kit.  It even comes with a bit of mechanical detail behind the visor which the ReZel Commander didn't even have! Terrible!  How could they overlook that?!  It's like the only Fed MP suit with a mono eye and they didn't include the detail for that?! wtf... (btw thanks Hemish for the great photo, the silver on it looks awesome.) Anyway, I think it's better than average and that's considering what an average suit it is.  Recommended for the MP, Fed, 0083 and/or GM fans.  It's a nice little guy to have on your desk to play around with.  A good looking model AND a fine toy as well so it gets a high score from me.

5/5.  Everything I thought it would be and more.  Worth the price I paid for it.  No regrets.

Friday, February 4, 2011

Thursday, February 3, 2011

HGUC GM Custom - Ideas

I love nearly every pic I see of this thing.


Trying to think of what I want to do with it and then I saw this.


Think I'm probably going to go in this direction... Or at least something similar.  I doubt I'll be doing any mods.  Gonna do the snap fit... Now I guess.  Jet lag is setting in so my sleeping schedule is messed up.  Can't play FF13 because my sister is sleeping (she has the PS3) but it's not like a have a job or even... a life... anymore so I can do whatever the F I want when I want to do it (outside of playing FF13) so I might as well just get back into Gunpla!  Finally set up a semi-decent makeshift work area... But I found a GREAT place here for my finished pics and my eventual proper work area but I'm gonna need a lot of time to get it set up right... but time is something I have now.  Finally.

Wednesday, February 2, 2011

I have arrived.

I should I say, "I have returned." in the voice of a Protoss Dragoon.

Flight was fine.  Delayed but fine.  I'm good at killing time.  Bought the GM Custom in the meantime (Duty free.  It was cheap.)  Read the new Hobby Japan and Dengeki Hobby.

Driving home from the airport, my mom stopped by a pet store to get some food for the cats. I went into the neightbouring craft store (Micheal's) to check their paints.  $2.50 for a small vial of Testors enamel.  Ouch.  I paid half that price in Japan.  Not sure how I'm going to set up my new "lab" here but I'm working on it.  Things are going to get weird.  I'm so used to using Japanese products but... just going to experiment and see what I can do with the domestic stuff.  Probably gonna end up painting in the garage... But it's so cold!  Argh!

But whatever... It's good to be home again!

Addicted to GM's!

Tuesday, January 25, 2011

HGUC ReZEL Commander Type


I got this as a gesture of solidarity between me and the members of the GAF MG ReZEL Group Build.

I was waiting for the MG ReZEL Command Type to be released before making the decision and... to be honest I just don't have the time for another MG before I leave. Shipping all this BUILT plastic is a pain in the butt never mind shipping whole boxes of unbuilt plastic. So I bought this ReZEL to remind me of all my friends doing the MG Group Build in the forums. Their work was really inspiring! I had to get a ReZEL of my own. Granted it's not MG so I can't participate but... I guess I'll be able to follow along in my own small way now. Good luck guys! Have fun! We'll be watching!

Wednesday, November 10, 2010

HGUC Sinanju - WIP 2

Worked a fair amount of time on this one today and got almost everything done except for the backpack.  What a joy this is to build.  Different from normal HG's.  More sturdy.  As it's MG counterpart was sturdier than standard MG's.  If you don't want to go through the trouble of making the MG this is definitely a good substitute.  It's beautiful and the construction is impressive.  All the details you need are there minus a bit of the articulation.  5 sets of hands, 4 beam axes.  Better than the MG in some ways!  This thing is good.  Maybe one of my favourite HG's.  Damn... Can the Sinanju really do no wrong?!