Monday, February 28, 2011

Sunday, February 27, 2011

HGUC Dreissen

From G.G.


As much as I love the Dreissen... This doesn't look quite right.  I think I would have liked the head to be just a bit flatter...  Guess I'd better wait for the finished model shots.  My enthusiasm has gone down a bit though...

MG Shenlong Gundam (Head)

Photo from Yellow Submarine.


Doesn't this head look a lot like Wing (all of them) and Epyon? Or is it just me?

Friday, February 25, 2011

MG Epyon - 2


Gotta admit... this is looking REALLY good. Hope it stays on line with this line art!

Thursday, February 24, 2011

HG 1/144 ANA Unicorn Gundam

Ugh... Why did they have to go and make this...

5000 yen though! Whoo! As much as I want it.. at that price? Plus shipping and mark up costs...

*shakes head*

I really would love to finish the collection though (unless they make yet another one after this!)... Might have to settle for looking at pictures of this one on the internet.

It's going to be a stunner though...  I can already tell and if I was in Japan with a job... I'd probably go for it.  *feels sudden wave of reverse home sickness*

Argh.  Just gotta learn to love what you have and not get possessed by what you want I guess!


From G.G.

Ah... It's so... beautiful!

Wednesday, February 23, 2011

MG Epyon


From Gundam Guy

ALMOST looks like some Ver.KA stylings here.  Never been a big Epyon fan but there is no question that the the suit is cool.  Maybe this is the model that will finally turn me on to it?

After the disappointment I felt with the "supposedly" Ver.KA PG Strike Freedom I'm going to hold off on this.  But... I know a LOT of people are going to be happy about this news regardless of how good the model is.  Epyon on principle.  I should too.  Melee God.  I have the MG Infinite Justice and Exia...  I think I'd need this to finish off the collection of "Top 3 Melee Combat MS".

What do you think?  Epyon for best melee suit?  Who's excited about this model?

Tuesday, February 22, 2011

MG 00 Gundam

The source.


Considering that the PG didn't impress me much with all the new technology it had, this isn't doing much for me either. Never really liked this suit. The stock 00 by itself isn't bad but... Not really feeling any of the upgrades (outside of the 7 Swords). The 1/144 00 ANA Gundam I have is enough for me.

Opinions? Who wants this?

HGUC GM Custom - Review

I never do reviews.  But this is a new era of Plamo Addiction (cue the reverb) so...  Time to switch things up.

Preface:  My Build Process

After building more than my fair share of Gundams, I've finally settled on a build technique that suits me.  I even do this with MG's but I'll detail that process separately when I review one.

1. I cut out everything and attach parts together that are meant to go together.  Like the two halves of a helmet for example.  I cut them out and them attach them together lightly, so they can be pulled apart easily.  I do this for any part that has a "partner".  Naturally this varies depending on the suit but I'm sure that most of you have built at least one Gundam model and know what I'm referring to.  If you don't... you'll see soon.

2. Not all parts have partners.  I cut those out too.  Very small parts I leave connected to the gate so I don't lose them but I cut around the runner, leaving only the parts I need.  Confused?  Scroll down to the pic that is 3rd from the bottom (the PC parts).  You'll see what I mean.

3.  I generally start from the waist because it is the center of the mech.  From there you can branch out and keep attaching parts.  I like seeing the mech form in that way.  Waist - Chest - Legs - Shoulders/ Arms - Head - Backpack - Weapons. The second way is to hit the largest pieces first just to get them out of the way.

The primary reasoning behind this is get as much plastic out of the box as quickly as I can.  I don't like having a lot of unnecessary things to look at.  I don't need all that runner plastic so I get rid of it right away.  I've built enough Gundams so that I know which part goes where (outside of PC parts), the manual is more for "confirmation" purposes than a "guide".

This is the same reason why I tend to assemble larger plastic pieces (like large rifles or shields) first just so I can get them out of the box or finished and then I have less things to look at.  This enables me to work faster as the build progresses while also giving me the satisfaction of seeing the mech "come to life" before my eyes, which is the part I like most and why I always assemble the frame first and then put the armour on after.  I'm a true "mecha" fan.  I like the "machine" aspect and enjoy building and looking at the "frame" and mechanical detail parts as much as I do the finished product.  This is also why I'll spend an extra amount of time to paint or highlight the parts of the suit that have exceptional attention to mechanical detail.

That's about it.  The build process varies from kit to kit and these aren't hard and fast rules but more like general guidelines that I tend to follow when I get a new kit.

I'm taking the time to explain all this now so you can better understand what's going on in the pictures and why I'm doing it the way I am.

Alright, let's get on with it!

The mech in question.  I'm a big fan of the GM Quel and this is almost the same suit but when I saw the reviews of this... I knew I wanted it.  After I built it I realized that it is different from the HGUC GM Quel in just enough ways to warrant the purchase.  I picked this up in Narita Airport as I was leaving Japan.  Truly... I bought Gundams right up until the very last moment that I was in that country.  As of now this is the LAST Gundam I've bought... And I can't see myself buying another one for a very long time.  I won't say it's my last Gundam... but there's a high chance that it will be.  At the very least this Gundam does symbolize the true end of an era.  And the beginning of another.  Thus it becomes the first Gundam that I officially "review".

As mentioned above I cut out all the parts and placed them with their "partner" pieces (which are generally right beside them on the runner).

Here are those same parts attached together loosely (so I can separate them easily.)  I do this just for the sake of organization and greater ease when I'm searching through parts in the box.  No Ngee Khiong EX style of paper box organization for me.  I just toss everything in the box and look for it manually later.  It doesn't take me that long.  Of course we're just talking about a 1/144 scale here.  I couldn't do it like this with a MG.

Assembled pairs plus add the parts needed to "complete" them.

Stand alone parts that won't need to be dis-assembled again.

Extra or single parts that don't have partners.

Organize the rest into their respective pair groups.

Standard mod.  I ALWAYS do this with HG's.  Generally the front skirt is molded as one piece so both sides move together.  I don't like that.

Simple.  Cut it in the center with the nippers and trim a slight bit so that they both move smoothly and independently. 

Semi assembled.  You can see that the newer HGUC's kind of have a frame of their own.  Not as intense as the MG's of course but... still a frame none the less

Parts that will be added to said frame.

Just a couple of small things left to put on.

This is pretty much all that's left after this much building.

KEY POINT:  The wrist joint of the hand on the right allows this model to hold the bullpup machine gun better than the other hand.  This was a problem I had with the GM Quel and ended up modding the rifle because of it.  I'm glad they changed this.  This is also the same type of hand that comes with the ReZel Commander so that it can hold it's rifle properly (which it still can barely do despite that.)

Even with the improved wrist, it's still a simple 2 piece part so it does still come apart easily.  This model comes with so many extra hands that I just glued it together with extra thin cement (after using this stuff I'll never go back to regular cement again. This stuff is awesome.  Little bit of clear green paint spilled on it while crossing the Pacific Ocean.  No other damage luckily!).

And here he is!  All done!  An important feature of this kit is the left hand gripping the underside of the gun.  It has a proper wrist joint so you can get poses like this with little effort.  I think this should become standard practice with all HGUC's from now on.

And it comes with so many different types of hands!  This is awesome!

And this is all that we're left with at the end.

With ReZel's hand and cannon.  I love giving older MS, weapons that weren't around when they were made.  Like the RX-78-2 with the Sinanju bazooka.

Here he is guarding my "Blade of the Immortal" collection.
Conclusion:

Good kit.  Very good kit.  I'm impressed.  The design is good, articulation is good (especially in the ankles and wrists) and they give you enough hands that you can give it a bit of personality and put him in a bunch of different poses.

Armament is sparse.  Two beam sabers, bullpup machine gun and a shield but that's what this suit is all about.  It's a soldiers suit. A high ranking soldiers suit but not something a new type ace would pilot.  I like the GM Custom for that reason.  It's a limited edition upgraded mass produced suit which is basically... my type of war machine.

The proportions are good.  Better than the Quel (which looks a bit lumpy in comparison to its predecessor)  and I really do like the shape of the head better.  I even like the protruding shoulders which is kind of rare for me.  I think it works with this suit.  I also think the idea of a baby blue MS is kind of ridiculous but... I like it here for some reason.  I think it all works.  And that's a telling sign for me.  Separately there are many things that I usually don't like about the design of some mobile suits in general and the GM Custom has a couple of those things but for some reason when I look at this suit, none of it bothers me.

The wrist joints sealed it for me though.  Being able to have it pose with both hands on the rifle and have it look naturally was a big selling point for me.  Glad I finished the previous era with this kit. It's great.  Looking forward to really working on it later on down the road.

It's a good example of what modern HGUC MP suits can be.  Very good, very well rounded.  The most telling thing is that I have nothing bad to say about this kit.  It even comes with a bit of mechanical detail behind the visor which the ReZel Commander didn't even have! Terrible!  How could they overlook that?!  It's like the only Fed MP suit with a mono eye and they didn't include the detail for that?! wtf... (btw thanks Hemish for the great photo, the silver on it looks awesome.) Anyway, I think it's better than average and that's considering what an average suit it is.  Recommended for the MP, Fed, 0083 and/or GM fans.  It's a nice little guy to have on your desk to play around with.  A good looking model AND a fine toy as well so it gets a high score from me.

5/5.  Everything I thought it would be and more.  Worth the price I paid for it.  No regrets.

Tuesday, February 15, 2011

Just talking... Mid Feb 2011

Semi Valentine's Day related post.

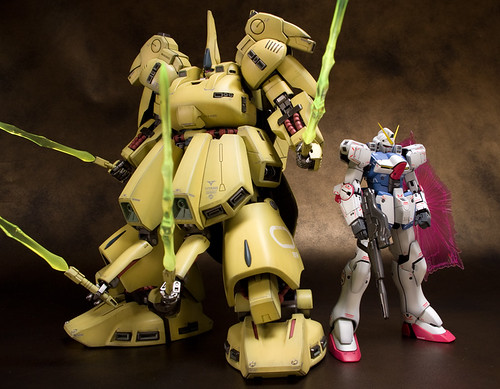
My 2nd former assistant took the pictures below.  I felt the need to post them because I thought that they were pretty good and I liked them a lot, especially considering that she's not into mecha at all.  She got good angles and had a steady hand.

This girl was not a Gundam fan.  She didn't even like Sci-Fi! (thus 'former'. I realize now that a girl that doesn't like Sci-Fi really can't be with me in a meaningful relationship.  She doesn't have to like it.  She can be neutral, but to out right say that she doesn't like it...  Next.) but after she started taking pictures of the Gundams and started posing them she said... "You know they're actually kind of cool... OMG I cannot get into this!"  But she kept taking pictures anyway.  Another sign... resisting herself because of some pre-determined stigma.  Not listening to yourself = Not good.

I think the thing that interested her most was the molding.  She's a designer for one of Japan's top automobile manufacturers and she was really into how the panels were made.  It was interesting to see what she took from the "Gundam" world.  Each of my assistants took something a little bit different and if I can help to foster a bit of understanding about this hobby that we all love, then I'm willing to make the sacrifices!  I'll let you guess what my sacrifices were.

It was really strange.  She designed parts for machines but she wasn't into machines at all.  She was more into nail art than anything, which ended up being a common bonding point between us actually because we talked about different kinds of paints, topcoat and uses of acrylic powder.  Strange but there it is.  Anyway here are her pics!


It's cool to see how Gundam looks to her.  She really captured the size of them from her upwards facing angles.  They really do seem like giant robots in her pictures sometimes.

How is this related to Valentine's Day at all? It isn't really. But Valentine's Day is about couples and relationships and as I mentioned before in a couple of posts, a lot of my recent relationships have had... crossovers into my Gundam life.

I'm glad that the women I date show an interest in what I like. And this blog... from it's inception was meant to chronicle my experiences with this hobby. I never thought that it'd go in this direction but... everything I post here IS Gundam related and it is part of "my" Gundam experience. It has spilled over into my personal life and I'm totally OK with that. Gundam is a big part of my life and nearly everyone who knows me in real life knows that I'm a fan and make these things. I'm not that shy about it. I don't advertise (well I do wear the occasional T shirt now and then) but I'm more than happy to talk to those people who show an interest in this hobby.

Anyway now that I'm home all of those days are behind me now. They remain good memories now. I'm still trying to find a good way to work on things here but it's not really coming together like how it did in Japan. Just don't have the space for everything right now. Still gotta clear up some more room.

Outside of that... I noticed that I don't really post on weekends because those are my "social" days. When I go out and meet and talk to people. Sunday is generally a relaxing day with my family and Monday to Thursday I'm working on... games. I've gotten back into games again. It's bad. I haven't been doing much outside of PS3 specifically Final Fantasy 13 and PS Move games. I recently just got Gran Turismo 5, Castlevania: Lords of Shadow and today I got StarCraft2.

There are so many things that I want to do for this blog but I haven't gotten around to any of them. Actually there are a lot of things I had planned for a lot of different things and I haven't really done any of them yet.

Everyone is telling me that it's OK to take time to adjust to being back and that I should take some time off after everything I've done recently but that's kind of the problem. I was moving at such a fast pace and I feel like I should just keep it up. Games have really been a big distraction. There was a time when I'd stopped playing games for months on end because my 360 was broken.  It was easy to find stuff to fill in the gaps. Now I have a PS3 with a decent sized HD LCD TV and a bunch of games I've been looking forward to.

I don't feel like I'm being very productive but... I'm enjoying my life. That has to count for something right?

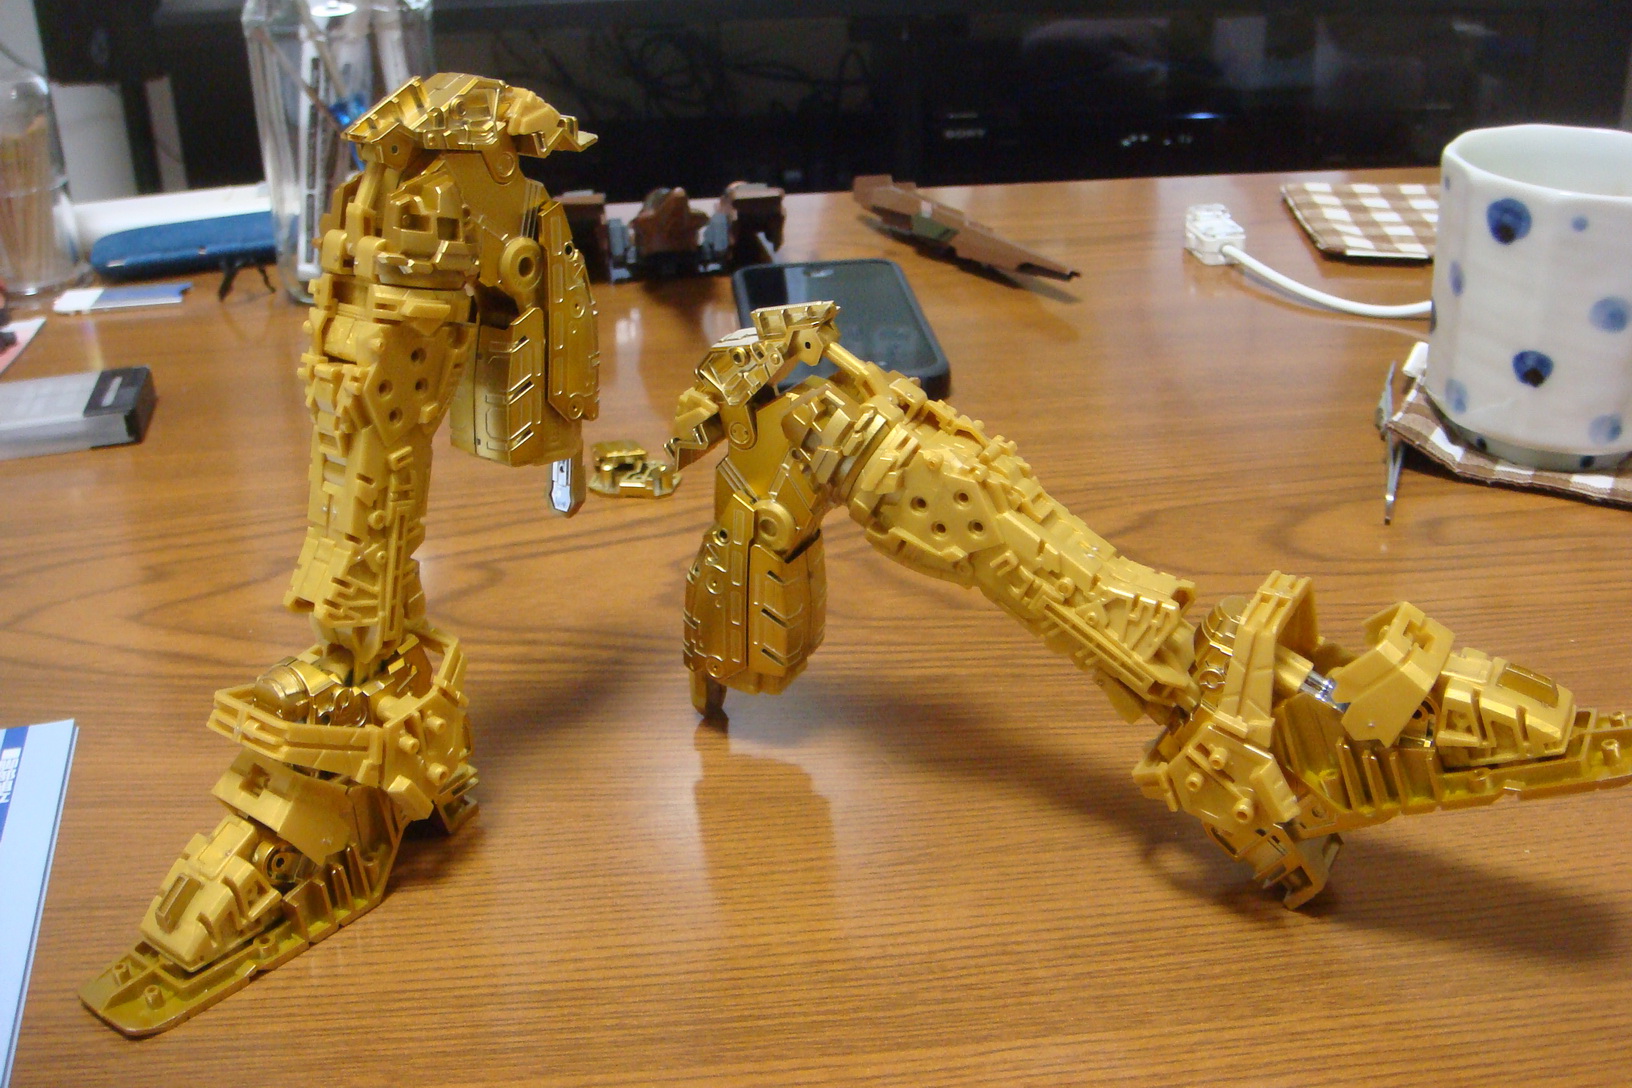
I've started work in the Titanium Finish RX-78-2 and I'm really enjoying it. I'm documenting everything so a decent WIP will be posted when I ever get around to it.

So much to do... and I don't even have a job! haha Oh well... let me stop writing and go back to work... on... something... don't know what. Kinda aimless. But I'm not just sitting around. I feel like I'm doing something all the time but I don't know if I can slot it all into the "productive" category.

I think the key might be to do something that is "concretely" constructive in my mind just to say "Yes. I did do that today." If I do something like that everyday I think I'll start to feel more... Fulfilled. Can't hurt to try.

If you've gotten this far thanks for reading.  It was kind of rambling blog post.  I do feel kind of aimless now.  Maybe my writing will start to reflect that more.

Anyway let me leave you with a pic of pure bad assedness.  Adrian made this masterpiece!  Be sure to check out his site here.  His scratch built work is pretty impressive!


and now that I'm back in Canada... Am I supposed to be focusing more on western women now? Let's try. What do you think?


Sara Underwood. I watch her on "Attack of the Show" now that I'm home. She does "The Feed". AND she was in Playboy apparently.

I still like Olivia more. Loyalty. I have it.

Friday, February 11, 2011

PG Strike Freedom - Frame Painting Details

Backtracking a bit as I'm trying to get the files on my computer a bit more organized.  I did take some more detailed pics of the frame earlier and it's about time to show them.  Unfortunately I didn't take proper before and after pics but you can kind of get an idea of what the original frame looks like here and hereThis blog also did something similar to myself with a good comparison of colours.  I did basically the same thing but I didn't learn about that blog until today for the record. I thought of painting the frame this colour on my own.  Just saying.

First off, I didn't paint everything because I thought it was unnecessary.  I left the plated parts as is, along with some of the gold parts. ASM took some great photos and he hasn't done anything to his frame yet so I'll be using him as a point of comparison.  These are his unpainted legs.  I elected to only paint the section below the knees because it was the most blatant offender (to my eyes).  I didn't go "all in" on the frame because I thought about ease of painting and the amount of time it would take.  I balance these considerations to get an acceptable effort/effect ratio.  The lower leg seperates easily below the knee.  I masked the feet and just sprayed it with Tamiya Acrylic X-12 Gold Leaf.

The arms were a little bit special.  I disassembled them, removed the plated parts, re-assembled and then painted as one piece.  I didn't paint the pieces individually.  I painted them as a whole.

Helmet, shoulders and torso were done.  I didn't do the chest vents.  I left that as is.  Yeah I'm burning candles in the background.  Don't you like to put on some incense, burn some candles and have a romantic evening with your Gundams?!  Haha jk I'm burning them up because I was moving out and wanted to use them before I left.

Entire waist/hip area + upper leg joints were done.  You can see I left a bit of the yellow on the knee caps.  Too small to be fussy about + I wanted to leave a bit of the yellow in just to break up the colours and add some separation to the parts.

I didn't bother with the feet.  Too much of pain to disassemble plus there isn't that much of that yellow to warrant me going through the effort.  There's enough plated gold there to balance it out.  Gotta think about the E/E ratio!

Rail guns turned out better than I'd hoped.  You can see a bit of yellow at the muzzle section.  That's where I held the part for painting.  Not being a perfectionist for this.  Just want to get the basic frame gold on principle.  Most of it is going to be covered up so I'm taking some short cuts.

Shiny gold body and flat light grey boots.  I like the contrast!
People have asked me "Why paint the frame?" and I can't really give a good answer.  It's just a compulsion to finish something that is unfinished.  And I believe the stock kit, fully assembled and finished is, indeed actually unfinished.  Yes, most of it will be covered up later but some of it will be exposed between cracks in the armour and I can tell you now, with the current paint scheme, the painted gold frame really paid off.  It's shiny in the places where I wanted it to be so I'm happy I did it... AND it didn't really take that much time or effort to do.

If you're the type of person that cares about that stuff I'd highly recommended doing it the way I outlined here.  It's low cost, low risk, low effort but high return.  I DO recommended using acrylics because you don't want to risk enamels or lacquers eating away the plastic (if you're not priming).  Trust me.

Wednesday, February 9, 2011

Doll X Gundam

During this time of transition in my life I have been hard pressed to find a place to display all my plastic. Luckily for me my mother is also a collector... of dolls!  Barbie dolls mainly but she likes many kinds.  She has some nice cabinets to display her collection too.  I can really appreciate them more now!  Like mother, like son I guess.  Take a look.


I elected not to put them in her cabinets because I have other plans regarding my boys and I need them to be mobile. She gave me some shelving racks that I can assemble and I'm probably going to use them in basement "den" which will become my new "lab". Right now she's just using it as a storage room so I'm going to be fixing that up. It will be pretty nice by the time I'm done with it.

But for now this lot is going to be staying here. I may bring the 3 Mark 2's into my room along with the Titanium Finish RX-78. I still have a couple more guys in a box here but I'm not going to bust them out until I get the display situation set up in the basement. After that... wait until March for the remaining troop reinforcements and then take it from there.

Still feels weird to be living at home again considering I've been on my own for nearly 15 years.  However... my life has never been this cheap and carefree.  Say what you want about independence but it does come at a price.  I've done enough in the past decade to warrant a bit of a break so I'm going to take it!