Monday, June 29, 2009

Terminators

I just watched Terminator Salvation last weekend and left feeling someone conflicted. I can sum it up best like this:
As a movie fan I found it acceptable for summer time action fare. It's not going to win any awards for best actor or best writing.
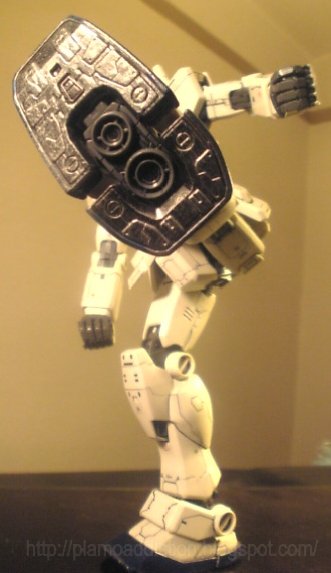
As a mecha fan I thought it was EXCELLENT. Great designs.
Overall I felt neutral about it.

Now I know this blog is primarily about Gundam plastic models but I'm going to expand the boundries a bit to talk about "MECHA" in general. Today I'm going to talk about the evolution of the "Terminator".

What got me into this was an article I saw in a Hobby Japan a couple of months ago showcasing some of the new Terminator models/toys/busts that are coming out soon/available. If you don't know, the machines in Terminator 4 predate the ones used in the original Terminator movie, so those of us who have seen all of them and are also mecha fans will get a bit of a treat in this movie as we can see a bit more of the Terminator R&D process.

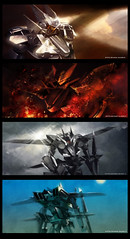
Take a look. After I saw this (and the movie) I realized that the mecha design in the Terminator series is actually quite deep and has a fairly comprehensive technological evolution tree.


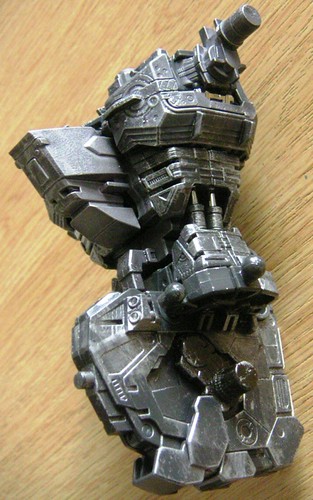
Showcased here are the T-600, T-700 and T-800 versions.

Here are some more pics.

T-600
Mentioned in the original Terminator movie, shown in the Sarah Connor Chronicles and in Terminator Salvation. Large, heavy, slow, plodding, covered in a latex rubber skin that is easily detectable by humans, thus easily disabled.


T-700
Shown briefly in Terminator Salvation. Hardly used and ended up being more of a touchstone for new technology culminating in the T-800. Lighter, smaller, faster than the T-600 but never seen with skin.
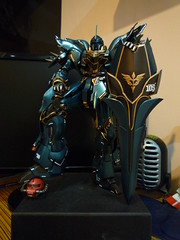


T-800
The Terminator that we all know. The most successful model; it was used in the first movie and almost every Termintor movie or TV show since. This is the most compact one. It has living skin so it is able to fool humans for prolonged periods of time thus earning the title of "infiltration unit". Because of it's learning CPU these Terminators are prone to "self awareness" after extensive periods of activation, usage and human contact.


Finally here's a shot comparing them.

From left to right. T-600, 700, ?, 800 (I know what the ? is now but in order for you to know you'll need to watch the movie.)


All info and pics (except for the magazine scans which I did myself) are from the Terminator Wiki.

Saturday, June 27, 2009

HG00 Exia R2 vs. HG00 0 Gundam

I like both of these a lot but I'm definitely on the side of the 0 Gundam. As I mentioned in a previous post, I'm really feeling this one.


Nice little fight scene there eh?

More images at http://blog.livedoor.jp/aburamamire/archives/857715.html

Tuesday, June 23, 2009

Strike Vermillion & Astray Strike Frame

A couple more shots of Strike Vermillion and Astray Strike Frame. Both models are incomplete. I still have a lot of work to do on both of them but for now this project is on hold and I'm moving back to my MG G04.

Tonzo mentioned in the last post that the katana on either side of the mech looks good as seen with the Astray Orange Frame and I'm starting to think that he's right on two points. One; in response to what I said about being a traditionalist and having two blades on one side of the warrior... He said that's true in the case of a Katana and Wakizashi but not necessarily a Katana and ANOTHER Katana. And I must agree. Two; there is the balance issue. The Katana/Wakizashi combination wouldn't look like how the Astray wears the double blades. It isn't that cumbersome and bulky (spoken with experience as I've done it myself on numerous occasions - don't ask.). I think it might be better if the Astray has a blade on either side... I mean it's not like robots are left or right handed right? And balance is more of an issue for machines... So... I can make the change and still maintain my principles haha

Without question the Astray is a bulky mech especially in comparison to conventional Seed designs like the Strike, Impulse, Freedom and so on. TheAastray looks like a football player next to a swimmer. But hey! We're all built differently right?! Just because he's bigger doesn't mean that he's not as effective or uglier! It's all perspective/opinion! I know a lot of guys out there who can't stand Seed's "anorexic" designs and like the Astray style a lot more.

That said... I like both of them. From the waist up I like the Astray but from the waist down I like the Strike... hey wait second... I wonder would it would look like if...

OK guys take a look at these pics, cause you won't be seeing these guys for while. In the meantime I'm going to try some 'experiments'.


Had to leave 'Afro Samurai Gundam Pilot Double B' in the pics for scale. These are some tall war machines!

Saturday, June 20, 2009

PG Astray: Strike Frame

From all of these runners, he emerged. Seriously. This is all of them. I didn't throw any away.


Construction operations completed.
*but I still have a long way to go before I can say this project is done*

Thursday, June 18, 2009

Flag Fighters for Life - 3

Part 2 is here. Thanks Gundam Guy. After the butchering these mechs recieved in Season 2 of Gundam 00, it's up to guys like us to show people how glorious they really are! If someone can post the source for this please do so. I forgot.


Wait! What? What's Kaori doing there?! hehe

Wednesday, June 17, 2009

Flag Fighters for Life


flags
Originally uploaded by sandrum
This has got to be one of the most beautiful depictions I've seen of the Flag's from Gundam 00.

The Flag remains one of my favourite designs from that series and I was quite dissapointed to see that it was all but eliminated in the 2nd season (whereas the Tierens still played a prominent role).

But pics like this will always leave me with good memories of Season 1. How about you guys? What was your favourite mech from Gundam 00 - Season 1?

Definitely this one for me.

Tuesday, June 16, 2009

HGUC Nu Gundam vs HGUC Hi-Nu Gundam

The difference in size is really surprising! I'm a bit dissapointed actually but still... this 1/144 Hi-Nu looks great! Front skirts seem a bit long but that's a minor gripe.

Might cave in and get this... I'll be heading back to Canada for the summer so maybe something like this to leave for the family to remember me? haha. It would also be nice to have a small little project for when I'm kicking around the house with nothing in particular to do.

And it pains me to say this but there are still a lot of my 'boys' who are currently 'in stasis' back home in Canada (translation: old gundam models in boxes or on a shelf somewhere collecting dust). I kinda feel like I'd like to bring a new 'brother' to them just so that they can get out that staleness they've been stuck in for years. Why not the Hi-Nu? Or the O Gundam? Or both?!


Photos from http://blog.livedoor.jp/aburamamire/ and http://blogs.yahoo.co.jp/taka421jp

Thursday, June 11, 2009

MSN-06E - Ebon Enforcer / MSN-06S Sinanju: Work Log Compilation


Master Kawaguchi Teaches How to Make Gundams

I got a free promo DVD months ago from... I can't remember. Anyway I finally got around to uploading it to the net.

They go through all the steps from beginner to advanced. Cutting from the gate, removing the nubs, minor detailing and modifications, battle damage, weathering, painting techniques, panel lining. He goes into great detail. You don't need to understand Japanese to learn this stuff (but it helps!)

Take a look!


Hope this video helps some of you with your plamo projects.

Wednesday, June 10, 2009

PG Astray: Strike Frame - Sub armour sections complete

I painted the figure just to show the scale. Yeah I know Lowe isn't black but I am! Where are all the black Gundam pilots?! Anyways I had no flesh tone paint so I just went with brown.


RGM-96X Jesta Cannon

If there is a God in Heaven we will see this become a MG someday.
*prays*

Sunday, June 7, 2009

HG O Gundam


1236555954845
Originally uploaded by sandrum

I've been wrestling with the idea of buying this for months now and I keep coming down on the side of DON'T... but I really want to and I love the design and I think the kit looks great.

I saw it at my local hobby shop the other day and I had to resist the urge not to buy it. In fact when I saw it, I held the box in my hands, thought about it and was forced to put the box down and leave immediately because I do NOT want give in and pick up yet another model.

Anyone else out there feel like this? You really want to buy a model and you have the money but there's just so many other things you should be doing and blahblahblah. I really want to get this but... I keep telling myself that I can. Just not now. That's kind of the good thing about Gundam models. I can still probably get this a couple of years from now.

But still... It's hard sometimes. It's hard to stop.

One of the main things that I like about this model is it's proportions and it's design. It's not as radical as most of the other 00 designs but it still seems quite modern. I like the simple armament as well. Shield, gun, beam sabre. However I don't like the look of the vents/exhaust ports on the calves though. Other than that it's a perfect suit for me.

Oh well. Someday. But for now, discipline rules.

Wednesday, June 3, 2009

GN-X Gundam


HJ0907122
Originally uploaded by Busterbeam

To be honest I'm really surprised that no one has mentioned this yet on all of the Gundam blogs that I follow. I was going to post about this immediately but figured someone else would beat me to it and save me the trouble. I was wrong. No one talked about.

Personally I think this was one of the best things to come out of this months Hobby Japan. I think this thing is insane! I love it! I like the GN-X design in general (all of them) but this one takes the cake by far in my opinion.

I like the thicker legs with the GN-X feet and I like the addition of the Gundam head as well. The level of detail and creativity in this kit is truly awe inspiring! We should all take notes! So do yourself a favour and check out the other pics of this masterpiece at my flickr. You'll have a better appreciation of plamo because of it, I'm sure.

Tuesday, June 2, 2009

Dry Brushing for Metallic Effect

So a couple people have been asking about how I achieved the weathered metal look on my PG Astray. Well it's actually quite a simple technique. I initially tested this technique on the soles of my RX-78-2 OWY Gundam.

rx78-2-95

Seeing the results, I decided I'd try this technique out again on the Astray (I can't call it the Red Frame anymore...)

Here are my tools.

Pretty simple. Usually I use a napkin (I keep the extra fast food napkins I get when I get take out) dap a bit of paint on it and rub the toothbrush bristles in it. The bristles on the toothbrush are normal softness but have gotten harder because of the paint that’s dried on it. Generally I use a silver enamel paint for this because it gives the type of contrast and light reflection that I'm looking for however I might move on to 'Dull Aluminum' the next time I try this. Just to switch things up and try something new.

I 'scratch' some marks onto the part and that's it! This technique works really well on edges and parts that have extra detail (as in some raised or sunken sections). The bristles catch on those sections and leave the paint there adding a lot of depth to the part.

Depending on the type of look you're going for, you can use a different kind of brush. For example of you're going for a slight wear and tear look or a more metallic but slightly dull finish to the part (ideal for people who like to do internal frame work) a soft brush would be recommended. The most important thing is to take the excess paint off the brush before applying otherwise it won't be much different than painting the part normally. Get rid of that excess paint! The less you have on the bristles the finer it will look in the end. After all... it's called DRY brushing for a reason! haha Also a brush with bristles in a fan shape is best for this. Recommended but totally optional.

The theme I'm going for on this Astray (you'll understand why when you read the story I made for it) demands this type of hard bristle work. I wanted the frame to look well used. Not like it'd been through hell and back or damaged but just that it had seen it's fair share of usage.


PICT0436

In this case I didn't even use a napkin and just used the lid of paint jar and applied the markings lightly (but still leaving thicker lines than usual). I didn't do this for any special reason. I was just lazy and thought that since most of the frame is going to be covered up that I don’t need to do a superior job on the frame; just an adequate one. And the results are adequate for me.

Astray Strike Frame Update:

Sub armour has been painted, touched up and attached. I don't have much left to do here. I'll be starting the armour application process before the end of the week. Trying to eliminate all the red from this project has been quite the undertaking but my experience with my EE Sinanju has definitely been coming into play with this process. Again. What is it with me and red? Just can't stand seeing it on my mechs sometimes.