
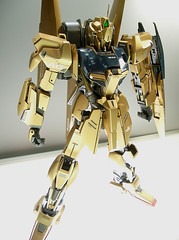
I don't know wtf this suit is but I LOVE it! Exia? Is that you?
Yes ladies and gentlemen (wait a second... do women actually read my blog?! I doubt it.) It is time for yet another Ritual Gundam Pic File Dump! Vol.2 for 2009!
I figured I'd send out a reminder of my contest with a couple of pics so you can get some ideas of what kits you'd like to choose.
For those who don't know, I'm having a photo contest and the prize is the HG 1/144 model of your choice. The catch is that it must be a mass produced MS. For example, a GM or Zaku of any kind is ok. But some thing like Hazel or Sazabi isn't. Those are prototype suits.
For more information please take a look at the top of the side bar. There's a link there that will give you all the info you need.
And yes I'm going to send it to the winner free of charge. No strings attached.
The contest will end at the end of the work week. I'm in Japan so for some of you that will be on the 5th. Thursday. So if you want a chance to win make sure you get your pics to me before then.
I will announce the winner in Friday's blog post.
Thanks to everyone who's sent pics already... To be honest they all made me laugh pretty hard! Very comical. Clever in some cases. Great job guys! Keep them coming!

My journey into the secret world of plastic robots.
Saturday, January 31, 2009
Free Give Away/Photo Contest Reminder/Ritual Gundam Pic File Dump Vol.2/Exia Variant?!
Thursday, January 29, 2009
MSN-06S Sinanju - Work Log 10 - Backpack complete but not without... BREAKAGE


Yeah... I'd love to say that was my work. I mean... dayum! Pretty impressive don't you think? Customized main thrusters and decals for this Sinanju. Really cool. I still like the original ones though. If anyone knows who the original modeller of this is, please enlighten me.
Now onto my Sinanju. It was fine after the initial assembly. The problem came after I painted it.
Now... the wings of the Sinanju look beautiful but how are they connected to the back pack? By a thin elbow joint. Really, if this were real life there's no way that such a flimsy part could hold the entire weight of that wing/thruster never mind holding up to the stresses put on it when that thruster is ignited. 64300kg of thrust per wing. Really it's actually quite ludicrous. Totally defies the laws of physics... for metal! Not for plastic though.
Anyways... what happens when that thin little elbow joint breaks? The answer is; No more wings! And that's what's happened to me. To both of them. Same break. Where? Take a look.

That's not to say that this part is going to break for everyone. I think it broke for me because I painted it without priming. I have a couple of theories about this.
Largely, I think that the alcohol in the paint made the plastic a bit softer/more brittle on that outside surface. No primer for protection. I had this problem with MG Impulse's knee-to-thigh lever and HG GM Powered's knee joint. They both snapped. For the same reason I think. Both were very thin parts under a lot of stress. The direct application of paint to the surface probably didn't help matters at all.
After I inserted it into the backpack is when the cracks started appearing. It didn't break outright. Neither of them did. They both broke the same way. First by becoming loose from tiny cracks and those tiny cracks became larger ones due to the stresses being put on them. Eventually I just broke the piece along those natural crack lines, glued the part back together, put some extra glue on top to strengthen it and then more paint on top to make that 2mm width about 4mm. Part of me is thinking to wrap a thin piece of 1mm pla plate around the part and glue it in place (I have the clear type of pla-plate that folds and rolls.).
Right now the elbow joints are functional but I have to be really gentle with them for obvious reasons. I really would like to do a bit more work on their structural integrity. I think I might still, just for piece of mind.
Outside of that it was pretty standard. Re-painted a lot of the pieces. Had to sand down some areas to ensure that the movement was maintained. Lots of decals on here.
I gave the fuel rods some special attention. Glued shut, puttied, sanded, primed and sprayed. I did a really good job on them. They are totally smooth (no seams) and I did my best paint job to date on them.
After working on the backpack I used my Gundam markers A LOT for paint touch ups. Really easy to use and nothing to clean up. I went out today and bought from more for the other colours that I doing.
Now, onto the legs!
Wednesday, January 28, 2009
MG Sinanju - Applying the water slide decals
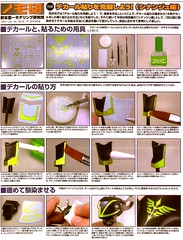
OK as you all know I'm hand painting the detailed parts on my Sinanju but if you're interested in using the water slide decals, here is pretty much the best way to do it.
From Hobby Japan #2. More at my flickr.
Also please note that I edited some of the colour values of the photos a bit so that the process would show up a bit clearer. This is not the actual colour of the decals or the parts.
Monday, January 26, 2009
Online blog templates - re vamping my blog. Again.
*edit*
OK just going to stick with it. Easier to edit and less things to screw up. Save time where you can so you can spend time where you want. Damn. I liked that other one too. Well this one isn't so bad. Back to the fine tuning.
*edit*
Had a bit of trouble with the header but I've at least got the banner up and showing. Problem is resolution. I know just under half of you are coming in using a 1280 pixel resolution. That should look fine up to about 1400. I made it for around 1320 which is my resolution.
But a fifth of you are coming in at 1024 and the header isnt going to look so good for you guys.
9% are coming in at 800 and around 15% are coming in at 1680 or 1600. 2% are coming at 2560! wtf?! Hard to get it right for everyone so a standard colour header would be best... but that's so boring! I'd like to have an image up there of one of my creations but... I don't know. I'm going to think about what to do. For now... Half of you should be seeing this OK. Still a work in progress!
*edit*
wow what a pain. Blogger is ok if you want things to be simple but if you want to try and be creative with the design... wow. You really have to know your html/xml etc. Finally got it the way that I want. Similar to the online template but... a couple of changes that should make it easier to load up and prevent crashes. Couldn't get everything EXACTLY the way that i want but... it's good enough for now. It'd take a lot of effort just to get some minor design changes so i'm just going to let it go. kinda like modelling. you have to know when to stop other wise you could go one forever and I feel like i have with this thing. I'm just going to leave it like this for now and get back to regular posting.
i checked the header on resolutions from 800 up to 1320 and outside of 800x600 (and to all you people, maybe it's time for an upgrade?) its acceptable so i think ive covered the majority of you. i tried a bunch of different solutions but in the end... the simplest one was the best. just resize the picture. at least i understand that. beats delving into the guts of the code. for me at least. but i am happy with the small number of things i was able to edit to my satisfaction. there was a fair bit of customization to my code. oh well. its all done now. back to posting!
Saturday, January 24, 2009
RGM-96X Jesta
More U.C.0096 goodness. A pic from last months Hobby Japan that I meant to put up but didn't get around to until now. Love this suit! If you missed my previous post on the Jesta, check it out here.
Friday, January 23, 2009
GN-006/SA Cherudim Gundam Saga
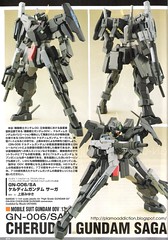
First post on the new blog will be from my new Hobby Japan which came in today. I'm going straight for the best thing; 1/144 HG Cherudim Gundam modded into GN-006 SA, Cherudim Gundam Saga. I loved this suit since I first laid eyes on it last month around this time. I actually made this image of it my wallpaper for my cell phone. You can imagine my delight when I saw a custom built one in this months Hobby Japan. I have to share the wealth! Every one goes on about 7 Swords Exia, or 7 Swords 00, what about 7 Guns Cherudim?! That's what I'm talking about! More at my flickr.
Wednesday, January 21, 2009
Blogger
getting there. still getting some minor errors from Blogger but... it's not affecting the performance or display of the blog which is good. i've never gotten so many error messages in my life from this company. no errors for a year and then all of a sudden 4 or 5 major ones? wtf. oh well, i think the worst has passed now. i like this look much more than the old one actually. blessing in the disguise maybe. thats all for today. tomorrow is another day.
224am
i hate html. you'd think there'd be an easier way to do all of this. figured out how to change the titles location by trial and error. wow. guess i'm going to have to get used to coding again. ugh...
115am
spoke too soon. its a blogger error for sure but apparently i could have solved it just by reducing the number of posts displayed? ah... oh well. this blog was due for a renewal anyways. think ive got the frame the way i want it... now to put the content back in. bare with me. this is the part thats going to take time.
wow.
first my code screws up randomly putting all the side bar info under the blog,
then the backup doesnt actually backup everything and i end up losing all my info
then i cant upload my saved template. then i cant upload any other template, cant preview my blog, cant delete my modules... and bloggers help section is... slim to say the least.
well this may be the end for me. how sudden. and its not like i even did anything. one minute its working the next...
Tuesday, January 20, 2009
Site's down for maintenance
MG Sinanju - How to use Gundam markers for the detailling
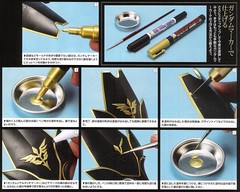
This is essentially the technique that I settled on and this is almost EXACTLY how I'm doing it. A couple of differences is that I don't paint directly on the part with the marker. I put some of the paint out and then paint it by hand with a fine brush. I'm just a bit worried about spillage but... I suppose this technique would work too. I scrape off the excess with a knife as shown here and I also use my Gundam Pen to do a bit of re colouring on the edges and grooves. I don't use the Real Touch one as is shown here. I want something a bit more precise. I don't have a black Real Touch marker otherwise I might give it a shot.
Monday, January 19, 2009
MSN-06S Sinanju - Work Log 9 - Shield / what to do about the gold detailing

Friday, January 16, 2009
My 1st Anniversary Give Away! / My Manifesto
The earth has made one complete revolution around the sun since I started this blog. One whole year has passed. And what a year it's been. I never thought that I'd get into Gundam this much. It's been a consuming hobby. Not all consuming but very 'enveloping' none the less.
It all started with simply doing the panel lines on my 1/100 Red Astray and painting the sword. After I spent that much time and attention to the details of the kit I must say... I was hooked. MG OYW Gundam followed. My first major recolouring operation. Then MG Force Impulse with an extra Excalibur anti-ship sword that I ordered directly from Bandai. Very rewarding project. MG Infinite Justice was assembled but I left it at that while I kicked around ideas of what to do with it. I've decided now but don't know when I'm going to get around to working on it, because MG Sinanju has been made a priority.
This isn't even including the HG's. GM Powered, GNX-III A Laws, FG Rasiel and Sefer. Even my old kits have come back out, Perfect Grades, Strike, Mark II and Zeta came out of their old boxes to join their brothers again. MG G04 was my first 'refurbishing' project that became a massive operation in customization and I am still really looking forward to finishing that one.
I went back to Canada and looked at my old model kits that I haven't seen in years with new eyes. I brought back the first Gundam I ever bought, NG S-Gundam, and an old Macross Strike Valkyrie that I never finished. An old HG Hi-Zaku came out of hiding. I slowly inched away from hand painting to painting by spray cans for a more even look. And it was less time consuming as well. I got a magazine subscription. I calculated it last night. I've spent about 40000 yen on Gundam stuff this year. That's about 3400 yen a month. It's not really that much in the grand scheme of all my expenses. Considering that one night out on the town can cost me about 10000 yen.
But it's never been about the money. It's never been about having the best blog, or the most hits, and even having the latest news. It's never been about that. It's always been about doing what you love to do. And for some ridiculous reason, I love these little plastic robot things that you assemble yourself. Maybe it's the amazing articulation. Maybe it's the fact that I think they just look ****ing cool. Or that I associate good memories of my childhood with them. I'm not sure why exactly, but I do know concretely that I do.
None of my friends or family are really into this kinda stuff. And oddly for a long time I kept it a secret. Actually I wasn't into it this much back then. I'd just assemble them and put on the stickers. Pretty basic. (I'd always sand down the nubs though, which is funny because that is a step that I've pretty much eliminated now but using a sharp knife). Red Astray changed all that. Or at least... it was my decision to be more thorough, and not accept what the company gave me or expected me to do. I did what I wanted to do with it.
I browsed the web and saw the masterpieces that people were creating. Some people may not think that word can apply to something like plastic models but I disagree. With the time, effort and care that some people put into their models, I believe that the moniker is fitting. They've earned it.
But I don't think I have yet. Sure I painted the frame of the MG Impulse and did a relatively decent re-colour job on it, but I still took a lot of short cuts. Basically I know what I have to do to make a good/complete model, but i haven't done it yet. Knowing the path and walking the path are two different things, and that can apply to a lot of different things in life.
And that brings me to another point about modelling. The qualities that it cultivates in the individual. An attention to detail, an eye for colour, patience, persistence. A vision. A plan. Maybe even a work ethic. Knowledge of tools and techniques. And most importantly... knowledge of yourself. Your limits, your desires, your styles and preferences... These are not bad things. They are not things to be embarassed of.
Sure we may be branded as otaku or geeks or nerds or whatever but what does that really mean? It simply means that we are passionate about something. I'd take that over feeling nothing and living a bland mundane life any day of week.
Do what makes you happy. In my case I've decided to share that with others who may have the same interests and i know now that you are legion! I am not alone. WE are not alone. There are others who are like us. And brothers! Together we are strong! WE affect industries! Games, models, toys, videos, anime, movies... all of these billion dollar industries are at OUR command. The customers, the fans, the otakus, the nerds, geeks, hobbyists, or even those on the fringe who are simply just curious. We can choose to support these industries or not. The companies will take notice and if there are enough of us, they will give us what we want. They want us to be happy. Because they want our money! haha
I felt alone before when it came to my interests but after a year of doing this I realize now that nothing couldn't be further from the truth.
So that brings me to the topic of my giveaway.
In this era of human history, 3 wars are currently waging. All in the middle east. Gundams and Mobile suits are weapons. KIDOU SENSHI (機動戦士) literally means "mobile war fighter". These machines are often portrayed as tools of destruction, rightly so as they were created for that purpose.
A game I play occasionally in Japan is the Gundam POD game called SENJOU NO KIZUNA (戦場の絆), literally, "Bonds of the battlefield.". Even in war we make bonds and friendships. So I'd like all of you, who are willing to participate, to send me pictures of your Gundams... in PEACEFUL poses with other Gundams!
For example:


The deadline is the end of this month. I will post the best photos on here and at other boards as well. Don't worry, I'll be sure to give you FULL credit.
Along with your photo please tell me your top 3 MASS PRODUCED mobile suits that currently have a HG 1/144 model version because... one of those models will be your prize!
2 photos per person, and then I'll choose which ones I think are the best. Please try to keep each file size to under 1 MB and no larger than 1200/1600 pixels.
Thursday, January 15, 2009
Ritual Gundam pic file dump
Monday, January 12, 2009
Re: Danny Choo's "Gundam Mods" post from Jan. 10/09

Bit of a hiatus there. Life gets in the way sometimes. Been away from Gundam for a little while but I'm back now.
So I was browsing the web and noticed that Danny posted about this and thought that I'd do a supplement to that post in case anyone wants to learn more about it. Danny was looking at Hobby Japan #2 and in it they have a little spread of a very unique mod to the MG RX-78-2 v.2. The holes plus the paint job give it a very cool 'steel' look. It almost looks like the thing was made of metal and that some of the edges could possibly cut you!
But it's all just plastic and paint.
Works like this really do a good job of showing off all the work that Bandai put into making the frame. If you take a look at the the other pic in my flikr you can see similar work this artist did on this model's corefighter and MG Ball. Very impressive work. I was planning on posting this one myself but Danny beat me to it but at least I can flesh out some of the details.
Wednesday, January 7, 2009
RGM-96X Jesta
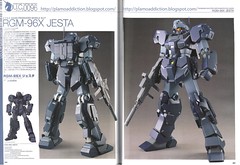
Alright, I'm going to start with the best as far as I'm concerned. This months Hobby Japan has got a large feature of scratch built 0096 suits and they look good! The Sinanju featured in my U.C.0096 gallery is actually not the MG that a lot of us are building now but actually a scratch built one made months and months ago. If you compare the two side by side (they did this in the magazine) the differences are very slight so I suspect that if future U.C.0096 suits are released they'll look very similar to these scratch built ones.
The one that I was taken the most with was this Jesta. Reminiscent of the RGM-79SP GM Sniper II or the RGM-79SC GM Sniper Custom. Take your pic. Except this is not a Sniper unit. On the contrary it’s a regular infantry suit.
Although it was made 10 years after Gundam Mark II (stats in italics) let’s do a comparison of the numbers.
Propulsion: 81200kg vs. 89030kg
Sensor range: 11300m vs. 14200m
Generator: 1930kw vs. 2710kw
Base Weight: 33.4t vs. 24.8t
I know. 10 years but still... When I look at this suit I don’t see a GM. The GM Custom from 0083 was actually comparable in power to Amuro's RX-78-2 just to keep things in perspective. This machine would smoke a Mark II easily in every category.
The thing I like about this suit is that it’s not special. It’s standard for its time. Maybe above average and it’s not overly armed. Grenades, Beam sabers, Beam rifle. But where’s the shield? That’s the only thing I’m concerned about. I'd like it to have a shield. Even the one the GM custom, Quel or Hazel used would be fine. This suit reminds me a lot of those one. It harks back to a time when grunt suits where GOOD and not cannon fodder like what the GM's and Zaku's eventually became. I guess that's just time though. All machines become obsolete eventually.
I also like the fact that this suit isn’t flashy. It's functional and has now become a personal favorite of mine.
Monday, January 5, 2009
MSN-06S Sinanju - Work Log 8 - Shield complaints

Friday, January 2, 2009
MSN-06S Sinanju - Work Log 7 - Armour application complete
Very hard session tonight as I could finally start to see the finish line. Last night and today I did the 2nd coat of paint on the leg and waist armour pieces. I decided to push it and just put all the armour on. I have the base colour down so I can get a good idea of what it looks like... and it looks awesome if I do say so myself haha! I am in love with this kit! I should say I'm in love with my kit because of the things I've done to it. The re-colour was a good idea.
But I think it all hit me when I attached the finished wings. Then the true majesty of the kit really struck me. The armour fits together perfectly. It's intricate but not overly complex. This kit was designed with symmetry in mind. There's no distiction between left and right parts until you put the armour on. I was really impressed with that aspect of the design. It would make things a lot easier to make production wise. A couple things become redundant in the process but... it would definitely save on manufacturing time on the whole. This is my first Ver.KA kit so I don't have a frame of comparison but if they're all like this... wow.
Everything is very sturdy. No problem holding poses. It is heavy though, which should be expected from a kit like this. I must say... this kit is a joy. Beautiful in so many aspects. If I had paid for it I'd say it's worth the money. But more importantly... it's worth the time. Beautiful. And the time you put in to it will be rewarded with the time you spend looking at it and the feeling that it gives you. Then you can change the pose and the accesories and feel it all over again haha. I'm just so... impressed!
I'm broken my work method down into stages:
Stage 1 - Washing, priming, 1st coat of paint
Stage 2 - Frame assembly
Stage 3 - Armour application, 2nd coat of paint (not always in that order)
Stage 4 - Detailing, Fine Tuning
Stage 5 - Decaling
I'm almost finished Stage 3. I'm going to do Stages 3-5 at the same time on each individual part. So I have the basic look down but I'm going to work on each part individually now. Feet, legs, waist, body, arms, shoulders, and backpack. The head is already done.
It was quite ambitious of me to think that I could get this all done before work on the 5th. There's no way. But I'm not going to rush it. If the kit looks this good now then it's going to look way better once I get everything the way I want it.
This kit will be my masterpiece so I'm going to give it the time to get it right.
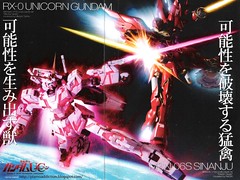
I will not be posting pics of my WIP henceforth, so I'm going to get back into my regular routine of magazine pics and scans. I'm going to start with spreads of other U.C. 0096 suits and then back to the Rasiel/Sefer stuff that I initially wanted to post about before my life got consumed by this kit.
Sticking with the U.C. 0096 theme here is the poster spread from the February issue of Dengeki Hobby. I really hope a Unicorn animation is released eventually. It seems like it would be such a great series!